
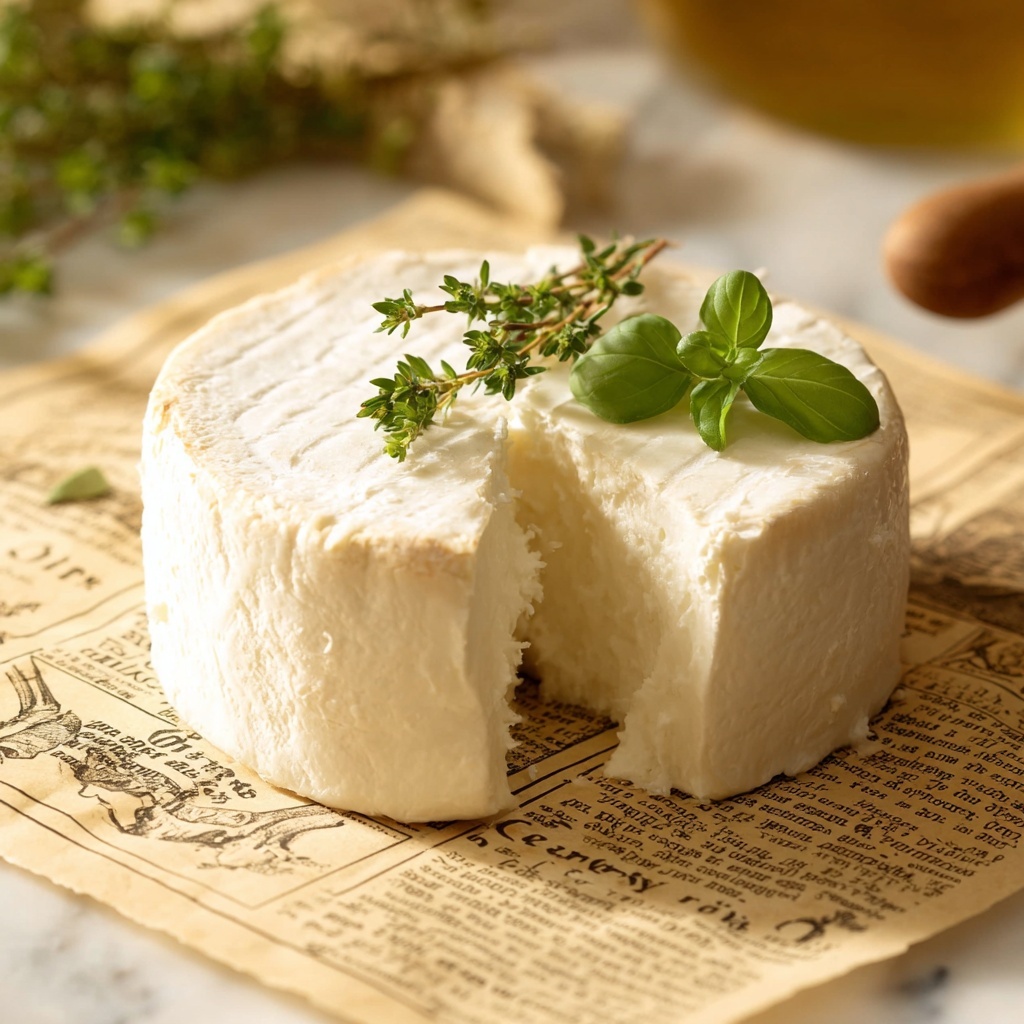
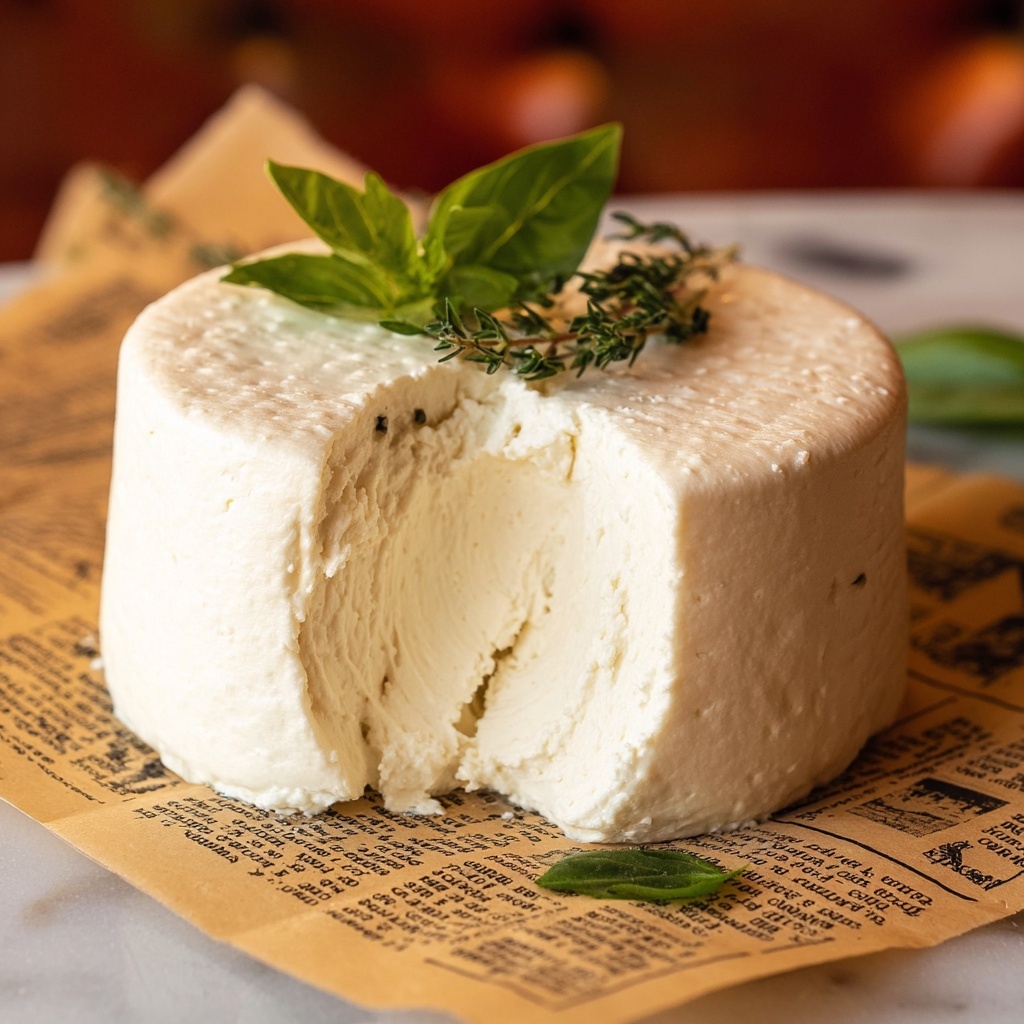
If you have been searching high and low for a deliciously creamy, tangy, and utterly satisfying alternative to traditional cream cheese that fits a vegan and nut-free lifestyle, you are going to fall in love with this Vegan Nut-Free Cream Cheese Recipe. Crafted with simple ingredients like coconut milk and vegan Greek-style yogurt, this recipe delivers the rich texture and flavor you crave without any nuts or dairy. Whether you’re spreading it on a bagel, dolloping it onto your favorite crackers, or including it as a smooth component in a recipe, this homemade vegan cream cheese brings unmatched freshness and versatility to your kitchen.
Ingredients You’ll Need
These ingredients are surprisingly few yet absolutely essential to achieve that luxurious cream cheese texture and luscious taste. Each item plays a key role, from adding creaminess and body to balancing the tang and saltiness perfectly.
- 350 g full-fat canned coconut milk (thick part only): This provides the rich, creamy base that’s crucial for the smooth texture and subtle coconut sweetness that blends seamlessly.
- 200 g vegan Greek-style yogurt or Skyr: Adds a bright, tangy note and creaminess; choosing a soy-based variety like Alpro ensures the nut-free quality stays intact.
- 1 tablespoon freshly squeezed lemon juice: Brings a fresh, zesty acidity that mimics the brightness of traditional cream cheese and helps with thickening.
- ½ teaspoon sea salt: Enhances all the flavors and balances out the slight natural sweetness of the coconut milk.
How to Make Vegan Nut-Free Cream Cheese Recipe
Step 1: Combine Your Ingredients
Start by adding the thick coconut milk, vegan Greek-style yogurt, lemon juice, and sea salt into a large mixing bowl. Grab a whisk and blend everything together until the mixture turns smooth and homogeneous. This is your base that already starts to hint at that indulgent cream cheese texture.
Step 2: Prepare to Drain
Next, set up a fine-mesh sieve or colander over another large mixing bowl. Line the sieve with a clean cheesecloth, which will help remove excess liquid and thicken your cream cheese. Carefully transfer your smooth mixture into this lined sieve.
Step 3: Squeeze Out Excess Liquid
Gently and carefully squeeze the cheesecloth to start extracting the watery part. Be mindful not to over-squeeze; the goal is a creamy, not watery, consistency. Once you’ve done this, secure the top of the cheesecloth with a rubber band to keep everything tidy for the next step.
Step 4: Apply Weight and Refrigerate
Place a small plate on top of the cheesecloth bundle to act as a platform for weights. Then, add 1–2 heavy cans or jars to gently press down and help the mixture firm up by draining excess moisture. Pop this setup into your fridge for about 2 to 4 hours. This patient step is the secret to achieving that perfect cream cheese consistency.
Step 5: Shape and Continue Chilling
If you’ve got a cheese mold handy, place the drained mixture inside it (still wrapped in cheesecloth) and refrigerate it overnight, up to 48 hours total. This extra chilling step will give your cream cheese beautiful form and depth of flavor. If you don’t have a mold, no worries—just keep it refrigerated in the cheesecloth for the full time to firm up nicely.
Step 6: Unwrap and Enjoy
After the chilling process, remove your luscious block of vegan cream cheese from the cheesecloth. You’ll notice a bowl full of leftover water and light cream, which is a fabulous ingredient to reserve for smoothies, soups, or stir-fries, reducing waste and maximizing flavor. What remains is your freshly made thick, spreadable, nut-free vegan cream cheese.
Step 7: Store Properly
Put your cream cheese into an airtight container. It can stay fresh in the fridge for up to a week or be frozen for longer storage—perfect for having a homemade special treat on demand.
How to Serve Vegan Nut-Free Cream Cheese Recipe
Garnishes
Elevate your vegan cream cheese by adding a sprinkle of freshly cracked black pepper, chopped chives, or a few juicy slices of sun-dried tomatoes on top. A drizzle of high-quality olive oil or a dusting of smoked paprika can also add a gorgeous color contrast and a subtle flavor pop that pairs beautifully.
Side Dishes
This creamy spread is incredibly versatile alongside fresh bagels, crusty artisan bread, or crisp vegetable sticks like cucumbers and carrots. It also works wonders dolloped onto warm roasted potatoes or stirred gently into savory vegan risottos for extra creaminess and tang.
Creative Ways to Present
Looking to impress guests? Shape your Vegan Nut-Free Cream Cheese Recipe into small balls or logs coated with toasted seeds or finely chopped herbs. Serve it on a charcuterie board with colorful sliced veggies, vegan deli slices, and a variety of pickles for a stunning, allergen-friendly spread.
Make Ahead and Storage
Storing Leftovers
Leftover cream cheese should be stored in an airtight container in the refrigerator. It keeps beautifully for up to 7 days, maintaining its creamy texture and bright flavor, ready to enhance any dish throughout your week.
Freezing
If you want to keep your vegan cream cheese for longer, freezing is a great option. Place it in a freezer-safe airtight container for up to 2 months. When thawed in the fridge overnight, the texture remains smooth and ready to spread or cook with.
Reheating
Since cream cheese is often served cold or at room temperature, reheating is not typically necessary. However, if you add it into hot dishes like sauces or soups, simply stir it in towards the end of cooking for a creamy finish without losing that wonderful flavor.
FAQs
Can I use a different type of yogurt in this Vegan Nut-Free Cream Cheese Recipe?
Absolutely! While vegan Greek-style yogurt or Skyr is recommended for its tanginess and thickness, you can try other soy-based or coconut-based yogurts as long as they are thick and unsweetened. Just avoid nut-based yogurts if you want to keep it nut-free.
What if I don’t have cheesecloth? Can I use something else?
If you don’t have cheesecloth, a clean, thin kitchen towel or a nut milk bag can work in a pinch. The main idea is to have a loose, porous fabric that allows liquid to drain while holding the solids in place.
Is this Vegan Nut-Free Cream Cheese Recipe allergen-friendly?
Yes! Since it avoids nuts entirely and uses plant-based dairy alternatives, it’s ideal for those with nut allergies or lactose intolerance. Just double-check your yogurt choice if you have other allergies.
How tangy is this cream cheese compared to traditional dairy versions?
This recipe strikes a lovely balance between creamy and tangy. The lemon juice and vegan yogurt provide enough acidity to mimic classic cream cheese tang without overpowering the palate.
Can I add flavors like herbs or garlic?
Definitely! Once your Vegan Nut-Free Cream Cheese Recipe is made, feel free to mix in minced garlic, fresh herbs, or spices to create custom flavors. It makes for excellent spreads and dips that suit your taste perfectly.
Final Thoughts
I’m so excited for you to try this Vegan Nut-Free Cream Cheese Recipe because it captures everything wonderful about traditional cream cheese—creamy, tangy, and comforting—without any nuts or dairy. It’s an easy, rewarding way to elevate your vegan cooking and baking. Trust me, once you make it at home, you’ll wonder how you ever lived without this gem in your fridge!
Print
Vegan Nut-Free Cream Cheese Recipe
- Prep Time: 10 minutes
- Cook Time: 10 minutes (straining and pressing time not included as passive time)
- Total Time: 24-48 hours (including chilling and pressing time)
- Yield: 8 servings
- Category: Dairy-Free Cheese
- Method: No-Cook
- Cuisine: Vegan
- Diet: Vegan
Description
This vegan cream cheese recipe delivers a creamy, tangy dairy-free spread that’s completely nut-free. Made from full-fat coconut milk and vegan Greek-style yogurt, it’s effortlessly smooth and perfect for spreading on bagels, using in dips, or adding richness to your favorite recipes. The process involves straining the mixture to achieve the perfect cream cheese texture, bringing a delicious plant-based alternative to traditional cream cheese lovers.
Ingredients
Vegan Cream Cheese Ingredients
- 350 g full-fat canned coconut milk (use thick part from the top only; from 2 cans of 400 ml each)
- 200 g vegan Greek-style yogurt or Skyr (e.g., Alpro soy Greek-style yogurt)
- 1 tablespoon freshly squeezed lemon juice
- ½ teaspoon sea salt
Instructions
- Combine Ingredients: Add the full-fat coconut milk (thick part only), vegan Greek-style yogurt, lemon juice, and sea salt to a large mixing bowl. Whisk thoroughly until the mixture is completely smooth and well-blended.
- Prepare to Strain: Line a fine-mesh sieve or colander with cheesecloth and place it over a second large mixing bowl to catch the liquid. Transfer the smooth mixture into the cheesecloth-lined sieve.
- Remove Excess Liquid: Gently squeeze some of the excess moisture out of the cheesecloth. Secure the top of the cloth with a rubber band to hold the mixture tightly.
- Press the Cheese: Place a small plate on top of the cheesecloth bundle, then weigh it down with 1-2 heavy cans (such as a 700g apple sauce jar or two unopened 400g cans). This weight helps press out additional liquid. Refrigerate this setup for 2-4 hours to drain.
- Mold the Cheese (Optional): After 4 hours of pressing, if you prefer a shaped block of cream cheese, place the mixture still wrapped in cheesecloth into a cheese-making mold. Refrigerate the cheese overnight, totaling 24-48 hours of chilling and draining. If not molding, continue refrigerating for the entire time without shaping.
- Remove and Reserve: Once chilled and fully strained, unwrap the cheese from the cheesecloth. You’ll have thick vegan cream cheese ready to use. The liquid collected in the bowl is a water and light cream mixture that can be saved for smoothies, soups, or stir-fries.
- Storage: Transfer the vegan cream cheese to an airtight container and store it in the refrigerator for up to 7 days. For longer storage, freeze it for up to 2 months.
Notes
- Use only the thick, creamy part of the canned coconut milk for best texture; chill the cans overnight to get the cream separated.
- The lemon juice adds a pleasant tang and helps with the cream cheese flavor development.
- Adjust the salt to taste depending on your preference.
- The liquid drained off can be repurposed in other recipes to avoid waste and add flavor.
- Pressing time affects texture: longer pressing yields firmer cream cheese.
- Using a mold is optional but helps to create a presentable block similar to traditional cream cheese.


