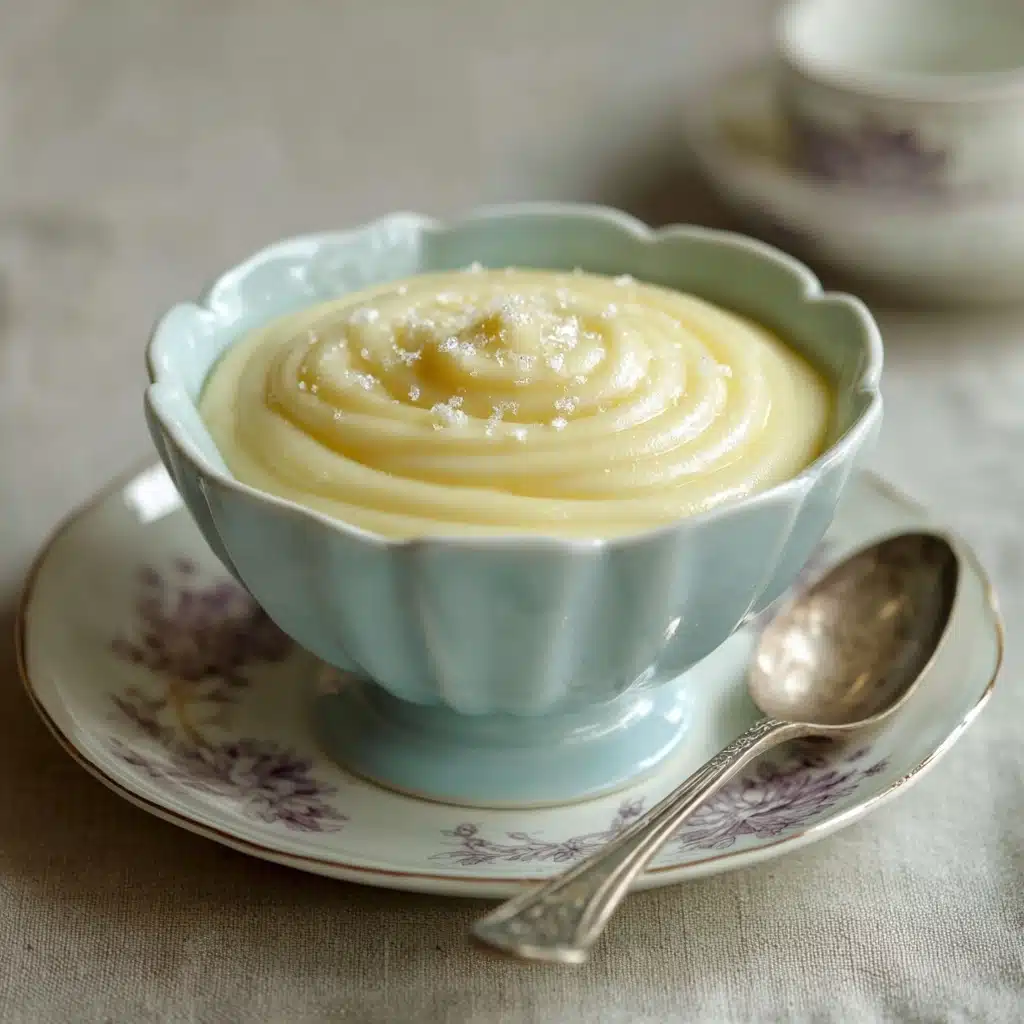
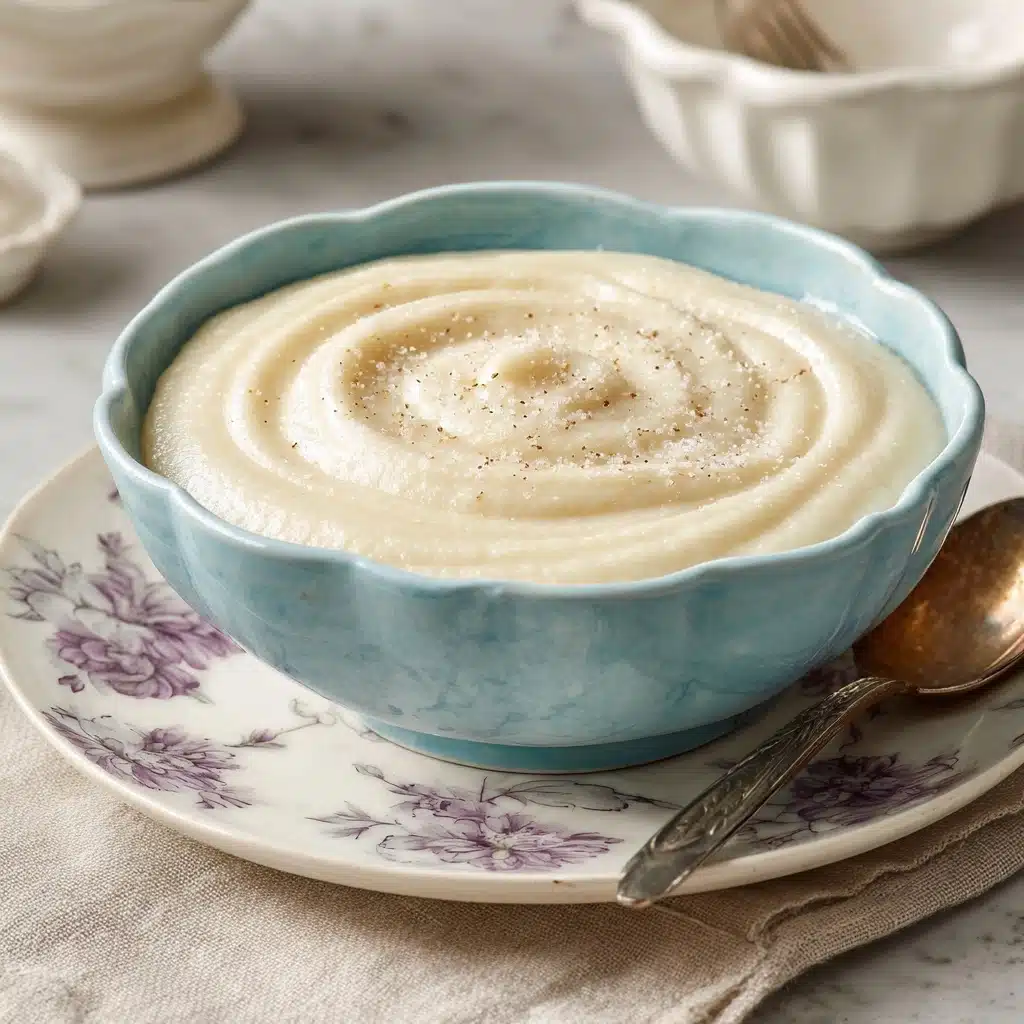
Silky, sweet, and effortlessly comforting, Vanilla Pudding is the kind of treat that brings back memories while making new ones every time you prepare it. There’s just something magical about the creamy texture and pure vanilla flavor that feels so homey and uplifting. Homemade from scratch, this luscious dessert transforms basic ingredients into something extraordinary—perfect for weeknight cravings, family gatherings, or nostalgic after-dinner moments. Today, you’ll discover just how easy and satisfying it is to whip up your very own Vanilla Pudding masterpiece!
Ingredients You’ll Need
Every ingredient in this recipe has a role to play—from richness to that classic vanilla aroma—working in tandem for pudding perfection. Simplicity really shines here, and each staple brings a special touch to flavor, texture, or appearance!
- Whole Milk: The backbone of your Vanilla Pudding, providing creaminess and a rich, velvety base that’s never too heavy.
- Granulated Sugar: Balances the flavors and adds just the right amount of sweetness to let the vanilla shine.
- Cornstarch: This is your thickening hero; it gives the pudding its smooth, luscious consistency without heaviness.
- Salt: Just a pinch enhances all the other flavors and keeps your pudding from tasting flat.
- Egg Yolks: They enrich the pudding, giving it that luxurious golden color and an extra-creamy mouthfeel.
- Unsalted Butter: Adds subtle richness and a silky finish to the pudding’s texture.
- Vanilla Extract: The star of the show! Use the real deal for the deepest, most aromatic vanilla flavor in every bite.
How to Make Vanilla Pudding
Step 1: Whisk Dry Ingredients with Milk
In a medium saucepan, combine 2 1/2 cups of the whole milk, the sugar, cornstarch, and salt. Grab your favorite whisk and blend everything together until the mixture is completely smooth—no lumps allowed! This base is what gives the Vanilla Pudding its silky strength later on, so take your time whisking.
Step 2: Prepare the Egg Mixture
In a separate bowl, whisk the egg yolks together with the remaining 1/4 cup of milk. This step allows the yolks to blend smoothly, preventing any curdling once the heat is introduced. Your patience here ensures a creamy pudding, free from scrambled eggs!
Step 3: Heat the Milk and Temper the Yolks
Place the saucepan over medium heat and stir slowly but steadily until the mixture begins to steam, but don’t let it boil yet. Once steamy, whisk about 1/2 cup of the hot milk mixture into your egg yolk mixture. This “tempering” step warms the yolks gradually, keeping them silky (not scrambled) before combining with the rest of the base.
Step 4: Cook Until Thick
Slowly pour the tempered yolk mixture back into the saucepan, whisking constantly. Keep the pan over medium heat and continue whisking until the pudding thickens and starts to bubble, which should take about 3 to 5 minutes. Once you see that gorgeous thickness and some gentle bubbling, you’re ready to move to the next (delicious) phase.
Step 5: Finish with Butter and Vanilla
Remove the pan from the heat, then immediately stir in the unsalted butter and pure vanilla extract. The butter melts in to give your Vanilla Pudding an even creamier finish, while the vanilla fills the air (and the pudding) with its signature scent. Stir until everything is smooth and dreamy.
Step 6: Chill and Serve
Pour the pudding into individual serving dishes or a single large bowl. This next tip is a game-changer: Press plastic wrap directly onto the surface of the pudding so no skin forms as it cools. Let it chill in the refrigerator for at least 2 hours—this patience pays off with the perfect texture and flavor.
How to Serve Vanilla Pudding

Garnishes
Dress up each serving of Vanilla Pudding with a flourish—think fresh whipped cream, a sprinkle of cinnamon or cocoa, shavings of dark chocolate, or a handful of juicy berries. Not only do these garnishes make your pudding pop visually, they also add wonderful layers of flavor and texture!
Side Dishes
This pudding is delightful on its own but is also wonderful with crisp butter cookies, biscotti, or a twist of almond biscotti on the side. For something heartier, pair with a scoop of fresh fruit salad—the cool tartness perfectly highlights the sweet, creamy notes of the Vanilla Pudding.
Creative Ways to Present
Turn your Vanilla Pudding into a showstopper by layering it in parfait glasses with crushed cookies or granola, building trifles with fruit and sponge cake, or presenting in tiny shot glasses for a playful dessert buffet. For a retro touch, serve it in vintage dessert bowls and top with a single maraschino cherry!
Make Ahead and Storage
Storing Leftovers
Leftover Vanilla Pudding keeps beautifully in the fridge for up to three days. Just be sure to keep each serving covered with plastic wrap (pressed directly onto the surface) or in an airtight container—this keeps it from drying out and maintains maximum creaminess.
Freezing
While Vanilla Pudding can be frozen, it may change texture slightly once thawed, becoming a bit looser or separated. If you do freeze it, store in individual servings and thaw gently overnight in the refrigerator—then give it a good stir before eating.
Reheating
If you prefer your pudding slightly warm, simply microwave an individual portion for 10-15 seconds until just warmed through. Stir gently to restore a perfectly smooth consistency, and enjoy a cozy twist on this chilled classic!
FAQs
Can I use a milk alternative to make Vanilla Pudding?
Yes! While whole milk delivers the richest texture, you can substitute with almond, cashew, oat, or soy milk. Just be aware that plant-based milks may yield a slightly different mouthfeel, and you may need to cook a little longer to achieve full thickness.
Is it possible to make Vanilla Pudding without eggs?
Absolutely. If you skip the egg yolks, increase the cornstarch slightly (to about 1/3 cup) to achieve a similar thickness. The final pudding will be less rich, but still silky and delicious—perfect for those with egg allergies or dietary preferences.
How do I avoid lumps in my pudding?
The trick is constant whisking and gradual heating. Whisk the cornstarch and sugar into the milk until completely smooth before heating. If you want absolute smoothness, strain the finished pudding through a fine-mesh sieve before chilling.
Can I double this Vanilla Pudding recipe for a crowd?
Definitely! This recipe doubles (and even triples) with ease. Just be sure to use a larger, heavy-bottomed saucepan and watch your heat—stirring constantly so nothing scorches at the bottom as you scale up.
What’s the difference between Vanilla Pudding and custard?
Great question! Pudding is thickened mainly by cornstarch, while custard relies more on eggs for body. Pudding is usually a bit creamier and lighter, making it perfect for layering or eating straight from the dish!
Final Thoughts
Nothing beats the comfort and joy of a classic Vanilla Pudding made from scratch—simple, satisfying, and endlessly customizable. Give this recipe a whirl and treat yourself to a nostalgic dessert that’s sure to become a regular favorite. Happy spooning!
Print
Vanilla Pudding Recipe
- Total Time: 15 minutes plus chilling time
- Yield: 4 servings 1x
- Diet: Vegetarian, Gluten-Free
Description
Creamy and decadent, this homemade Vanilla Pudding is a classic dessert that is sure to please everyone. With its silky smooth texture and rich vanilla flavor, it’s the perfect ending to any meal.
Ingredients
Ingredients:
- 2 3/4 cups whole milk
- 2/3 cup granulated sugar
- 1/4 cup cornstarch
- 1/4 teaspoon salt
- 3 large egg yolks
- 2 tablespoons unsalted butter
- 2 teaspoons vanilla extract
Instructions
- In a medium saucepan, combine 2 1/2 cups milk, sugar, cornstarch, and salt. Whisk until smooth.
- In a separate bowl, whisk egg yolks with remaining 1/4 cup milk. Place saucepan over medium heat and cook, whisking constantly, until mixture begins to steam.
- Slowly whisk about 1/2 cup of the hot mixture into the egg yolks to temper them, then return the yolk mixture to the saucepan. Continue cooking, whisking constantly, until pudding thickens and bubbles, about 3–5 minutes.
- Remove from heat and stir in butter and vanilla until smooth.
- Pour pudding into individual serving dishes or one large bowl. Press plastic wrap directly onto the surface to prevent a skin from forming.
- Chill for at least 2 hours before serving.
Notes
- For an extra creamy texture, strain pudding through a fine-mesh sieve before chilling.
- You can also fold in whipped cream after chilling for a lighter mousse-like dessert.
- Prep Time: 5 minutes
- Cook Time: 10 minutes
- Category: Dessert
- Method: Stovetop
- Cuisine: American
Nutrition
- Serving Size: 1/2 cup
- Calories: 210
- Sugar: 22 g
- Sodium: 100 mg
- Fat: 8 g
- Saturated Fat: 4.5 g
- Unsaturated Fat: 3 g
- Trans Fat: 0 g
- Carbohydrates: 32 g
- Fiber: 0 g
- Protein: 4 g
- Cholesterol: 115 mg


