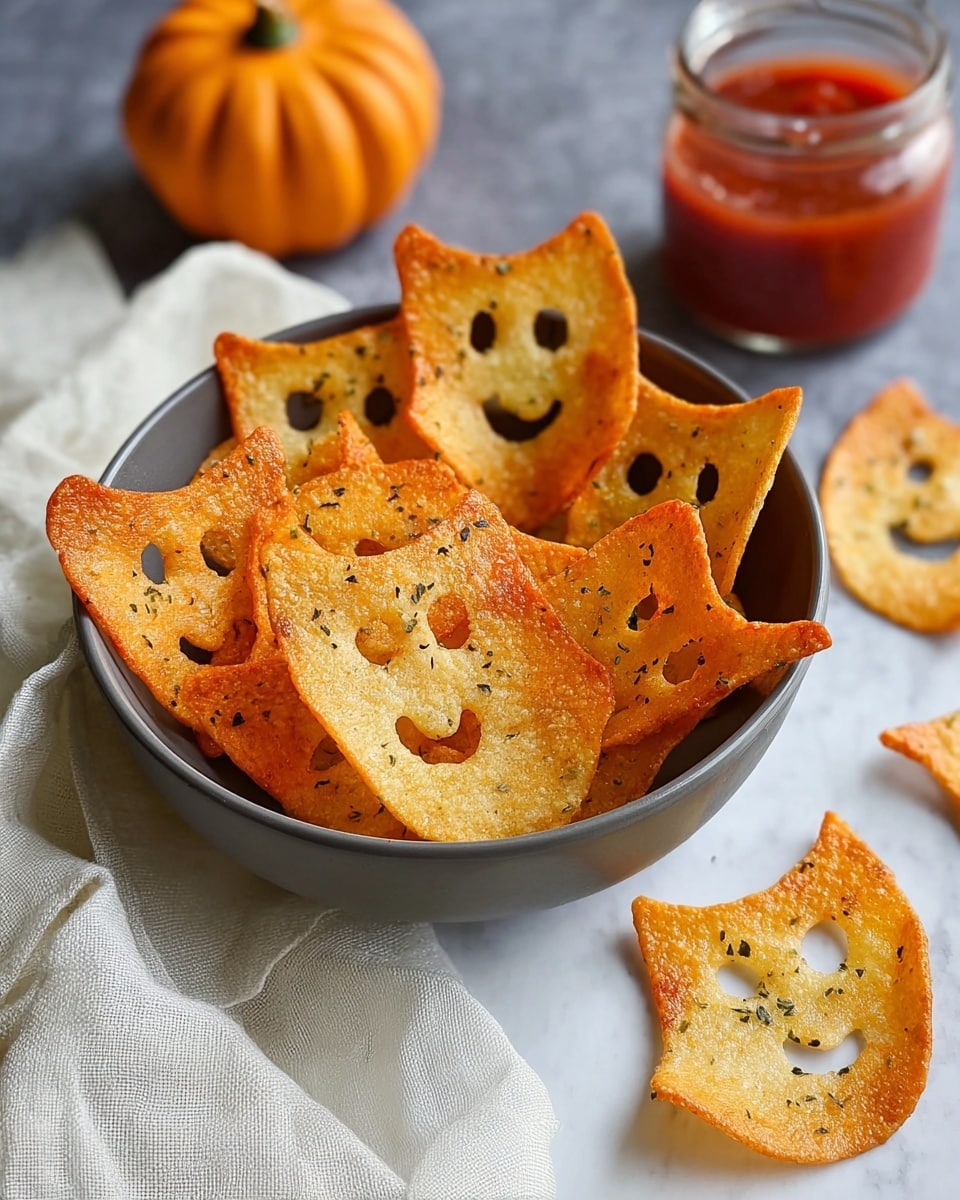
If you’re looking to add a fun and festive twist to your Halloween celebrations, the Spooky Baked Halloween Chips Recipe is an absolute must-try. These crispy, golden chips shaped into playful spooky designs are not only visually delightful but also surprisingly simple and delicious. Perfect as a snack, party appetizer, or a crunchy accompaniment to your favorite dips, this recipe brings together easy-to-find ingredients and a bit of creativity to make your Halloween extra special.
Ingredients You’ll Need
No need for complicated ingredients here—just a few simple essentials come together to create a chip that’s light, crispy, and perfectly seasoned. Each item plays a critical role, whether providing the perfect base, keeping the chips light, or adding that irresistible savory touch.
- 4 flour tortillas: The canvas for your spooky shapes, choose gluten-free or grain-free if you prefer.
- Avocado or olive oil spray: Helps achieve that golden crisp without weighing down your chips.
- Salt: A generous sprinkle brings out the true flavor and adds that satisfying seasoning.
How to Make Spooky Baked Halloween Chips Recipe
Step 1: Prepare Workspace
First, preheat your oven to 375°F (190°C). Then line two large baking sheets with parchment paper. This simple step ensures your chips bake evenly and don’t stick, setting the stage for perfect crispiness.
Step 2: Cut Spooky Shapes
Stack 2 to 3 tortillas for efficiency. Using Halloween-themed cookie cutters, press firmly to create a variety of spooky shapes—think bats, pumpkins, ghosts, or witches’ hats. Carefully place them in a single layer on your baking sheets, ensuring none overlap so every chip crisps up beautifully.
Step 3: Oil and Season
Next, lightly spray both sides of your tortilla shapes with avocado or olive oil. This will help them bake into golden perfection while maintaining a light crunch. Sprinkle salt generously and evenly to bring out the flavor and add just the right touch of savory goodness.
Step 4: Bake to Crispy Perfection
Bake the chips for 8 to 12 minutes until they turn golden brown and crispy. Don’t walk away! Oven times can vary, so keep a watchful eye to prevent burning. If you’re using multiple sheets, rotating them halfway through baking ensures even cooking. The smell alone will have you eager to try these.
Step 5: Cool and Serve
Once baked, transfer the chips immediately to a wire cooling rack. Letting them cool completely helps them firm up and achieve that perfect crunch. Serve these right away for the best texture, or store them in an airtight container at room temperature to enjoy over the next 3 to 4 days.
How to Serve Spooky Baked Halloween Chips Recipe

Garnishes
Elevate the spooky vibes by sprinkling some festive colored sea salt or a pinch of smoked paprika on top just before serving. Tiny edible eyes or small dollops of guacamole can also add a fun, playful touch to your chips.
Side Dishes
These chips pair wonderfully with a variety of dips such as a vibrant pumpkin hummus, a creamy roasted red pepper dip, or a classic fresh salsa. Their light crispiness balances perfectly with rich or tangy accompaniments that complement your Halloween feast.
Creative Ways to Present
For a party, arrange your spooky chips on a dark serving tray with cobweb-like cheesecloth underneath for instant spooky flair. You can even stand some chips upright sticking out of a jar filled with dip for a fun display that invites guests to dig in.
Make Ahead and Storage
Storing Leftovers
You can keep any extra Spooky Baked Halloween Chips Recipe leftovers in an airtight container at room temperature. This helps keep them crispy for up to 3 or 4 days, perfect if you want to prepare in advance for a Halloween gathering.
Freezing
While these chips are best enjoyed fresh, you can freeze them in a sealed plastic bag for up to a month. When ready, simply thaw at room temperature and re-crisp them briefly in the oven to regain their crunch.
Reheating
If your chips lose their crisp after storing, pop them back in a preheated oven at 350°F (175°C) for 2 to 3 minutes. This quick refresh brings that irresistible crunch right back, making every bite as delightful as the first.
FAQs
Can I use gluten-free tortillas for this recipe?
Absolutely! The Spooky Baked Halloween Chips Recipe works wonderfully with gluten-free or grain-free tortillas, making it accessible for various dietary needs without sacrificing taste or texture.
How do I prevent the chips from burning?
Keep a close watch during baking, especially towards the end of the cooking time. If using multiple baking sheets, rotate them halfway through for even cooking, and remove any chips that brown faster.
Can I make these chips without cookie cutters?
Yes! Freehand cutting with a small knife works just fine. Just aim for fun Halloween shapes or even irregular chips for a rustic, homemade look.
What dips pair best with these chips?
From guacamole, salsa, and pumpkin hummus to creamy cheese dips, the Spooky Baked Halloween Chips Recipe offers a perfect crunchy base for a variety of flavorful dips.
How many chips does this recipe yield?
This recipe makes about 32 chips, depending on the shapes and sizes you cut, perfect for a small gathering or as a snack to share.
Final Thoughts
There’s nothing quite like the joy of biting into crunchy, seasonal treats that bring a smile and holiday spirit to any table. The Spooky Baked Halloween Chips Recipe is such a delight—easy to make, wonderfully festive, and absolutely tasty. Next time you want a fun and healthy snack to impress your friends and family, give this recipe a try and watch everyone fall in love with these crispy, spooky chips!
Print
Spooky Baked Halloween Chips Recipe
- Total Time: 22 minutes
- Yield: 32 servings 1x
- Diet: Gluten Free
Description
Create festive and crispy Halloween-themed baked chips using flour tortillas. These spooky-shaped snacks are lightly oiled and salted, baked to golden perfection, and perfect for party treats or a fun snack.
Ingredients
Chips
- 4 flour tortillas (use gluten-free or grain-free as needed)
- Avocado or olive oil spray
- Salt, to taste
Instructions
- Prepare Workspace: Preheat your oven to 375°F (190°C). Line two large baking sheets with parchment paper to prevent sticking and ensure easy cleanup.
- Cut Spooky Shapes: Stack 2 to 3 tortillas and use Halloween-themed cookie cutters to cut out desired shapes. Press firmly to ensure clean edges. Carefully arrange the shapes in a single layer on the prepared baking sheets, making sure they don’t overlap for even baking.
- Oil and Season: Lightly spray both sides of each tortilla shape with avocado or olive oil spray to help them crisp up and enhance flavor. Sprinkle salt evenly over the top to season the chips perfectly.
- Bake to Crispy Perfection: Place the baking sheets in the oven and bake for 8 to 12 minutes until chips are golden brown and crispy. Keep a close watch to prevent burning, as baking times may vary depending on your oven. Rotate the baking sheets halfway through to ensure even browning.
- Cool and Serve: Once baked, immediately transfer the chips to a wire cooling rack. Allow them to cool completely so they get extra crisp. Serve them fresh or store in an airtight container at room temperature for 3 to 4 days to keep them crunchy.
Notes
- Use gluten-free or grain-free tortillas if you need a special dietary option.
- Keep a close eye on the chips during baking as they can quickly burn after reaching golden brown.
- Experiment with different seasonings like paprika or garlic powder for a unique twist.
- Store leftover chips in an airtight container to maintain crispiness for several days.
- Prep Time: 10 minutes
- Cook Time: 12 minutes
- Category: Snack
- Method: Baking
- Cuisine: American
