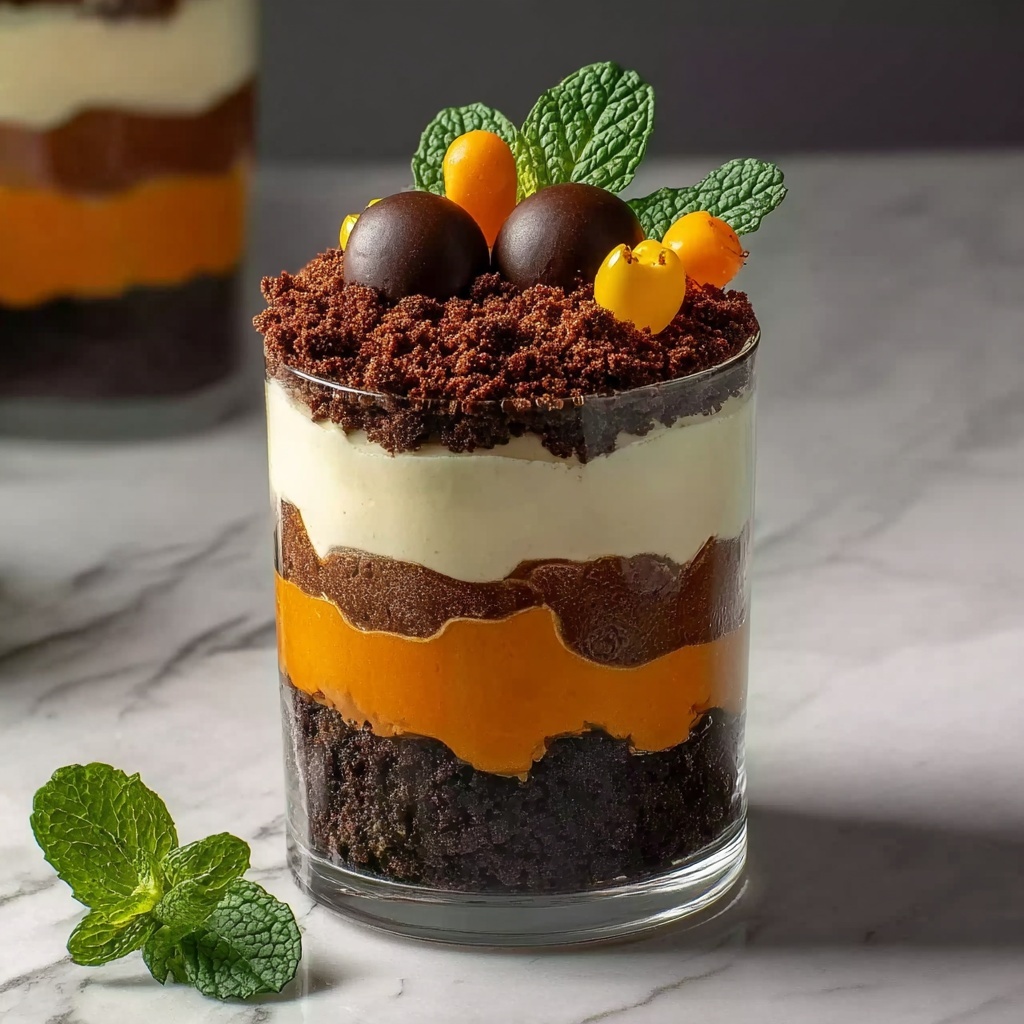
If you are searching for a delightful treat that captures the essence of fall with fun and flavor, the Pumpkin Patch Dirt Cups Recipe is exactly what you need. This playful dessert layers rich chocolate pudding with crunchy Oreo “dirt,” whipped topping, and festive pumpkin candies, creating a whimsical and indulgent experience that everyone will adore. It’s simple to make, perfect for sharing, and a guaranteed crowd-pleaser at any autumn gathering.
Ingredients You’ll Need
These ingredients are wonderfully straightforward yet essential to building the perfect balance of creamy, crunchy, and sweet textures in your Pumpkin Patch Dirt Cups Recipe. Each one plays a special role, from the silky pudding to the crunchy “dirt” that adds that iconic look and bite.
- Instant chocolate pudding mix: The foundation of rich, smooth flavor that sets the tone for the dessert.
- Cold milk: Essential for properly thickening the pudding for a luscious texture.
- Oreo cookies, crushed: Creates the “dirt” that adds crunch and contrasts beautifully with the creamy pudding.
- Whipped topping: Adds lightness and fluffiness to blend with the pudding for a heavenly feel.
- Pumpkin-shaped candies: Perfect for that festive harvest touch and a sweet pop of color.
- Small clear plastic cups: These display every delicious layer, making the presentation as charming as the taste.
- Pretzel sticks: Used as pumpkin stems, adding a salty crunch and visual whimsy.
How to Make Pumpkin Patch Dirt Cups Recipe
Step 1: Prepare the Chocolate Pudding
Start by whisking together the instant chocolate pudding mix with cold milk until the mixture thickens, then let it chill for about five minutes. This step is crucial to get that smooth, creamy base that will hold everything together.
Step 2: Fold in the Whipped Topping
Once the pudding has chilled and set, gently fold in the whipped topping. This adds a light, airy texture that makes the dessert indulgent but not heavy, perfect for balancing the richness of the pudding and Oreos.
Step 3: Layer the Crushed Oreos
Create the “dirt” effect by placing a generous layer of crushed Oreo cookies at the bottom of each small cup. This crunchy layer forms the base and brings that signature chocolate cookie flavor to every bite.
Step 4: Add the Pudding Mixture
Spoon the creamy pudding and whipped topping blend over the Oreo “dirt,” filling each cup about three-quarters full. This layering contrasts the textures and gives you a perfect bite every time.
Step 5: Top with More Oreo “Dirt”
Sprinkle the remaining crushed Oreos on top to seal the deal. This top layer reinforces the “dirt” look and adds a satisfying crunch right under the pumpkin pumpkin patch decorations.
Step 6: Decorate with Pumpkin Candies and Pretzel Stems
Finish off your Pumpkin Patch Dirt Cups Recipe by sticking a pumpkin-shaped candy and a pretzel stick into each cup. These little details turn the cups into mini pumpkin patches that are as adorable as they are delicious.
How to Serve Pumpkin Patch Dirt Cups Recipe
Garnishes
To amplify the fall vibes, consider adding a sprinkle of cinnamon or nutmeg on top of the Oreos before placing the pumpkin and pretzel decorations. You could also dust edible gold glitter for a magical autumn sparkle that catches everyone’s eye.
Side Dishes
Serve these dirt cups alongside crisp apple slices or soft gingerbread cookies for a deliciously complementary fall spread. The freshness of fruit pairs well with the richness of the cups, making your dessert table varied yet cohesive.
Creative Ways to Present
Instead of clear cups, try serving the Pumpkin Patch Dirt Cups Recipe in mini terracotta pots with liners for an extra playful presentation. You can also use small mason jars and tie a rustic ribbon around each jar, perfect for parties or gifting to loved ones.
Make Ahead and Storage
Storing Leftovers
If you happen to have any leftovers, simply cover the cups tightly with plastic wrap or store them in an airtight container and refrigerate. They will stay fresh and maintain their delicious texture for up to 2 days.
Freezing
This dessert is best enjoyed fresh and does not freeze well because the texture of the pudding and crushed Oreos can become soggy upon thawing. It’s better to prepare it the same day you plan to serve it.
Reheating
Since this is a cold dessert, reheating is not recommended. Instead, enjoy these cups chilled straight from the fridge for the best experience every time.
FAQs
Can I use homemade chocolate pudding for this recipe?
Absolutely! Homemade chocolate pudding will work wonderfully and add a personal touch. Just make sure it’s fully chilled and thickened before folding in the whipped topping.
Is there a non-dairy alternative for the milk and whipped topping?
Yes, you can substitute almond, coconut, or oat milk and use a plant-based whipped topping to make this dessert friendly for dairy-free diets.
Can I make the Pumpkin Patch Dirt Cups Recipe ahead of time?
Yes, you can prepare the pudding mixture and layering ahead, but add the pumpkin candies and pretzel stems right before serving to keep those decorations nice and fresh.
What if I don’t have pumpkin-shaped candies?
No worries! You can swap for any fall-themed candy, gummy pumpkins, candy corn, or even small fresh pumpkin pieces to keep things festive.
Can these dirt cups be made gluten-free?
Definitely! Use gluten-free chocolate pudding mix and substitute the Oreos with gluten-free chocolate sandwich cookies to keep the treat safe for those with gluten sensitivities.
Final Thoughts
Trying the Pumpkin Patch Dirt Cups Recipe is like taking a delicious, whimsical trip to a pumpkin patch right in your own kitchen. It’s an easy, crowd-pleasing dessert that brings smiles with every spoonful. Whether you’re hosting a fall party or just want a cozy treat, these cups are sure to become a favorite that you’ll come back to season after season. Don’t wait to whip up this fun and festive delight!
Print
Pumpkin Patch Dirt Cups Recipe
- Prep Time: 15 minutes
- Cook Time: 0 minutes
- Total Time: 15 minutes
- Yield: 8 servings
- Category: Dessert
- Method: No-Cook
- Cuisine: American
Description
These Pumpkin Patch Dirt Cups are an easy and indulgent fall treat perfect for all ages. Featuring layers of creamy chocolate pudding, crunchy crushed Oreos, and festive pumpkin-shaped candies atop pretzel stems, these no-bake desserts capture the spirit of autumn with minimal effort and maximum fun.
Ingredients
Ingredients
- 1 package (3.9 ounces) instant chocolate pudding mix
- 2 cups cold milk
- 1 package (14.3 ounces) Oreo cookies, crushed
- 1 container (8 ounces) whipped topping, thawed
- 8 pieces pumpkin-shaped candies
- 8 small clear plastic cups
- 4 sticks pretzel sticks
Instructions
- Prepare the pudding: In a large bowl, whisk together the instant chocolate pudding mix and cold milk until the mixture thickens. Chill the pudding in the refrigerator for 5 minutes to set.
- Combine with whipped topping: Gently fold the thawed whipped topping into the thickened pudding until the texture is smooth and fully combined, creating a creamy pudding mixture.
- Layer crushed Oreos: Place a generous layer of crushed Oreo cookies at the bottom of each small clear plastic cup to form the ‘dirt’ base.
- Add pudding layer: Spoon the pudding mixture on top of the Oreo base, filling each cup about three-quarters full for perfect layering.
- Top with more Oreos: Sprinkle the remaining crushed Oreos over the pudding layer to create a dirt-like appearance on top.
- Decorate with pumpkins and stems: Insert one pumpkin-shaped candy and one small piece of pretzel stick into each cup to mimic pumpkins with stems in a patch.
Notes
- Use cold milk to ensure the pudding sets properly.
- Crushing Oreos finely makes the texture more realistic for the ‘dirt’ effect.
- You can substitute whipped topping with homemade whipped cream if preferred.
- For a gluten-free option, use gluten-free chocolate sandwich cookies.
- This dessert is best served chilled and consumed within 1-2 days for optimal freshness.

