
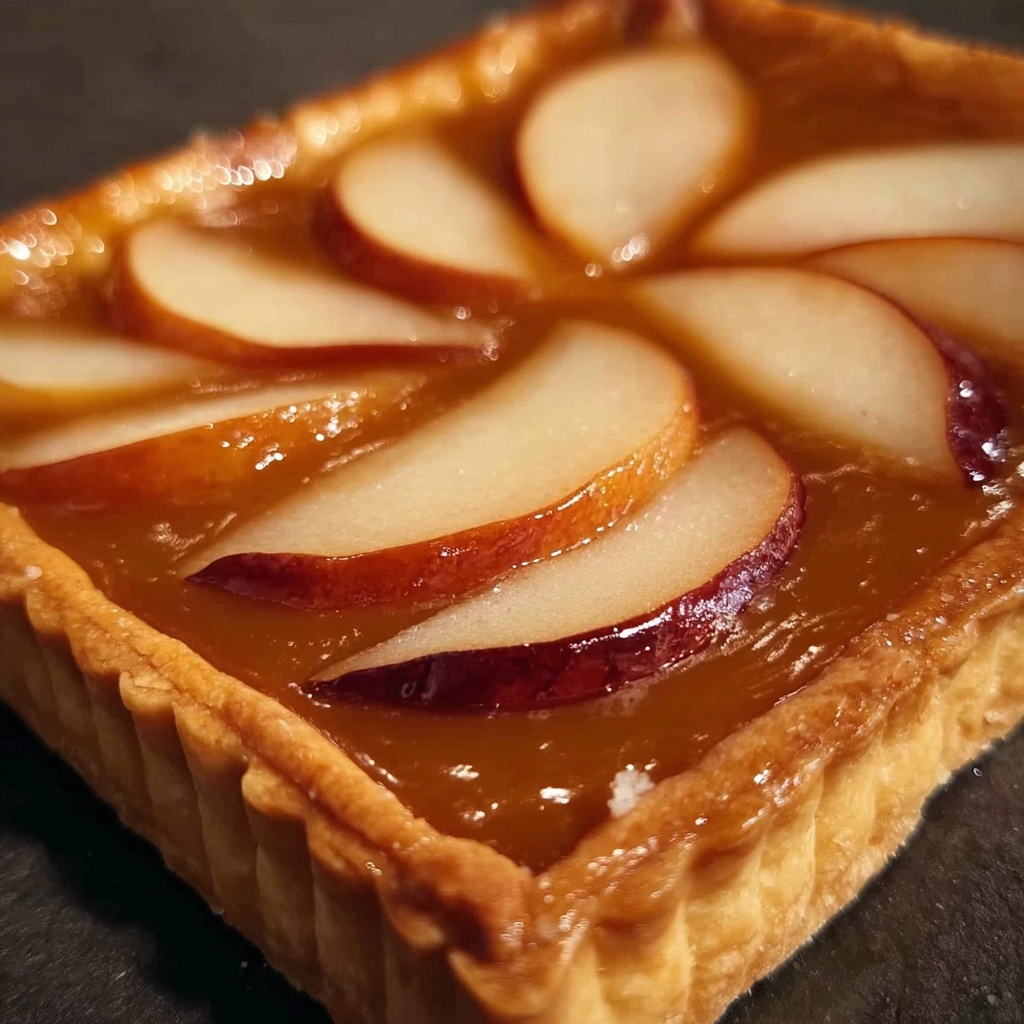
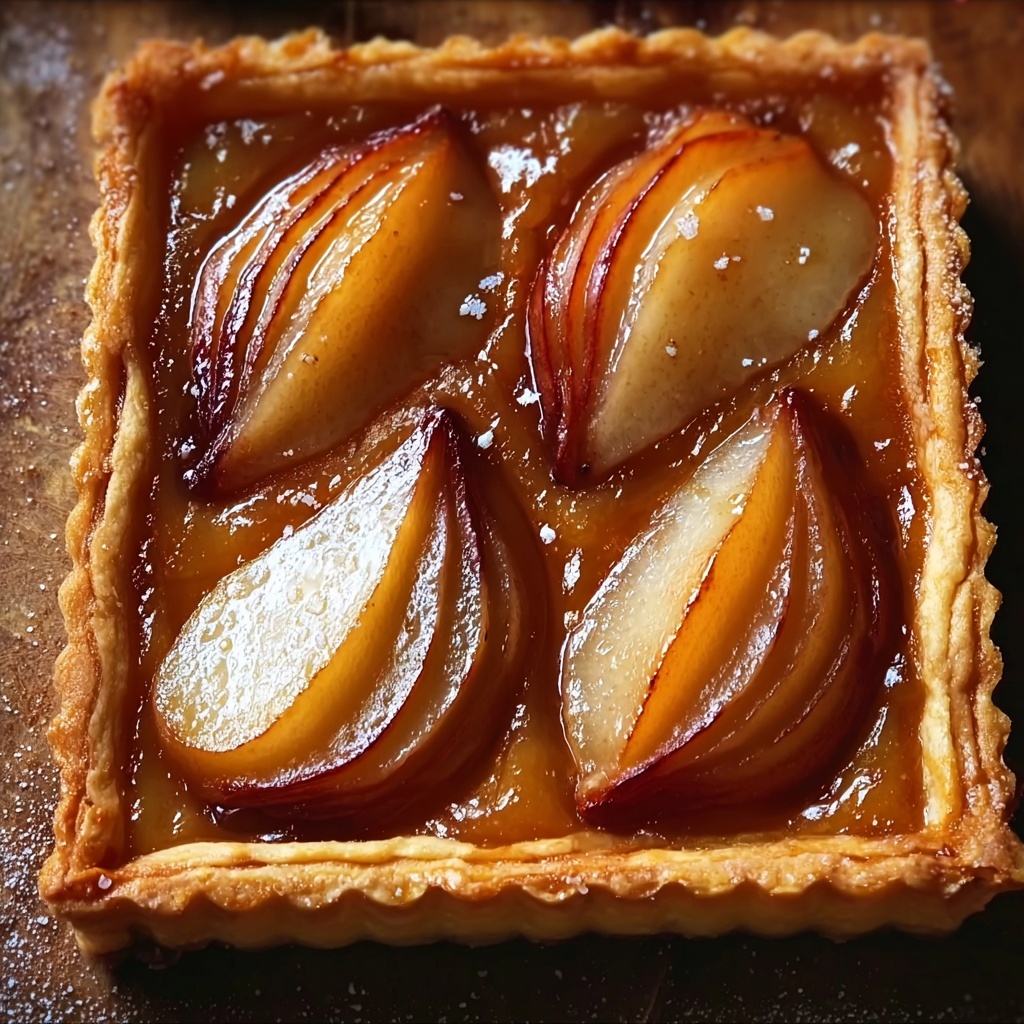
If you’re searching for a dessert that’s both stunning and absolutely delicious, the Pear Tart with Sliced Hasselback Pears and Cream Cheese Filling Recipe is sure to win your heart. This tart combines the buttery flakiness of puff pastry with the creamy, subtly sweet tang of cream cheese and the tender, delicate flavor of beautifully sliced Hasselback pears. Each bite bursts with layered textures and a gentle sweetness that’s balanced perfectly by a hint of lemon. Whether you’re baking for a special occasion or just want to treat yourself, this recipe is a wonderful way to showcase pears in a way that’s both elegant and approachable.
Ingredients You’ll Need
You’ll find that the ingredients for this Pear Tart with Sliced Hasselback Pears and Cream Cheese Filling Recipe are straightforward yet carefully chosen to highlight the star flavors. Each component plays a critical role in ensuring perfect texture, sweetness, and visual appeal.
- Frozen puff pastry sheet: Provides the flaky and buttery base that crisps up beautifully in the oven.
- Bartlett pears, D’Anjou pears, red pear: A mix of pear varieties adds depth to flavor and color for that gorgeous visual contrast.
- White sugar: Balances pear tartness and helps macerate the fruit for enhanced juiciness.
- Lemon juice: Adds a fresh zing while preventing the pears from browning.
- Cream cheese: Creates a smooth and luscious filling that complements the pears perfectly.
- Confectioners’ sugar: Sweetens the cream cheese without any gritty texture.
- Vanilla extract: Adds warm, aromatic notes to the cream cheese filling.
- Turbinado sugar: Sprinkled on top, it gives a lovely crunch and caramelized finish after baking.
How to Make Pear Tart with Sliced Hasselback Pears and Cream Cheese Filling Recipe
Step 1: Prepare the Puff Pastry Base
Begin by preheating your oven to 400°F (200°C). Take the sheet of thawed puff pastry and gently roll it out a bit to even thickness. Carefully fit the pastry into a 10-inch square tart pan with removable sides, pressing it into the edges to hold its shape as it bakes. This will give you a crisp, buttery canvas for the filling and pears.
Step 2: Create the Sliced Hasselback Pears
Take each halved and cored pear and place it cut-side down on your cutting board. Using chopsticks or wooden skewers on either side as a guide, slice the pear lengthwise into thin slices without cutting all the way through. This classic Hasselback method allows the pear to fan out during baking, resulting in an eye-catching presentation and tender texture.
Step 3: Macerate the Pears
Place the sliced pear halves into a bowl and sprinkle with white sugar. Squeeze the juice of half a lemon over them, which brightens the flavor and helps keep the pears looking fresh. Toss gently to coat and let them sit for about 5 minutes. This step softens the fruit slightly and encourages delicious syrupy juices.
Step 4: Prepare the Cream Cheese Filling
In a mixing bowl, blend together the softened cream cheese, confectioners’ sugar, and vanilla extract until smooth and creamy. This luscious mixture will act as a velvety layer between the crisp pastry and tender pears, lending a subtly sweet and tangy dimension to the tart.
Step 5: Assemble the Tart
Spread the cream cheese filling evenly over the puff pastry base, going right up to the edges. Then, carefully arrange the Hasselback pears by fanning them out across the cream cheese, making sure they overlap slightly for that gorgeous ripple effect. Drizzle any juices released from the pears over the top to infuse additional flavor.
Step 6: Bake to Golden Perfection
Sprinkle the top of the tart generously with turbinado sugar. This coarse sugar will bloom during baking, creating a satisfying crunch and caramelized surface. Place the tart in the oven and bake for about 35 minutes, or until the puff pastry is puffed and golden brown and you see the syrupy juices bubbling around the pears.
Step 7: Cool and Serve
Remove the tart from the oven and let it cool briefly so it sets slightly and is easier to slice. Enjoy the energetic mix of flaky crust, creamy filling, and tender pears in every bite.
How to Serve Pear Tart with Sliced Hasselback Pears and Cream Cheese Filling Recipe
Garnishes
A simple dusting of powdered sugar or a few fresh mint leaves adds an elegant touch. You could also drizzle a bit of honey or a caramel sauce to amp up the sweetness and presentation. These finishing touches enhance both flavor and aesthetics.
Side Dishes
This tart pairs wonderfully with a scoop of vanilla ice cream or a dollop of whipped cream to offer a cool and creamy contrast. For a more indulgent experience, a small cup of espresso or a glass of chilled white wine complements the delicate pear flavor beautifully.
Creative Ways to Present
For special occasions, serve individual tart slices plated with a thin slice of pear and a sprig of thyme on the side. You can also arrange smaller versions of this tart as mini servings for brunch or tea parties. Presentation is a breeze with the natural fan shape of the Hasselback pears.
Make Ahead and Storage
Storing Leftovers
If you have any leftovers from your Pear Tart with Sliced Hasselback Pears and Cream Cheese Filling Recipe, store them in an airtight container in the fridge. It will stay delicious for up to 3 days while retaining the tart’s lovely texture and flavor.
Freezing
This tart is best enjoyed fresh, but you can freeze the unbaked tart wrapped tightly in plastic and foil for up to 1 month. When ready, thaw it in the fridge overnight before baking. Avoid freezing once baked as the puff pastry loses its crispness.
Reheating
To reheat leftovers, place individual slices on a baking sheet and warm them in a preheated 325°F (160°C) oven for about 10 minutes. This method helps revive the crisp puff pastry without making the cream cheese filling too warm or runny.
FAQs
Can I use other types of pears for this tart?
Absolutely! While Bartlett, D’Anjou, and red pears offer great flavor and texture contrasts, you can substitute with Bosc or Comice pears if you prefer. Just be sure they are ripe but firm enough to hold their shape when sliced Hasselback style.
Do I have to use puff pastry?
Puff pastry is ideal for this recipe because of its buttery, flaky texture that pairs beautifully with the cream cheese and pears. You could try a homemade tart dough, but the results will be denser and less delicate.
Can I prepare the cream cheese filling in advance?
Yes, you can make the cream cheese filling a day ahead and keep it refrigerated. Bring it to room temperature and give it a quick stir before spreading it on the pastry base to ensure it’s smooth and spreadable.
Is this tart suitable for a holiday dessert?
Definitely! The elegant presentation of the Pear Tart with Sliced Hasselback Pears and Cream Cheese Filling Recipe makes it a perfect centerpiece for Thanksgiving, Christmas, or any festive gathering where you want a refined yet approachable dessert.
What can I use instead of turbinado sugar?
If you don’t have turbinado sugar, you can substitute with coarse sanding sugar or even raw sugar. The goal is to add a sparkling, crunchy top layer that caramelizes nicely when baked.
Final Thoughts
This Pear Tart with Sliced Hasselback Pears and Cream Cheese Filling Recipe is truly a showstopper that’s not as complicated as it looks. Its beautiful layers and harmonious flavors make it a delightful treat to share with friends and family. Trust me, once you bake this tart, it will become one of your favorite go-to desserts for any occasion. So grab those pears and start creating some magic in your kitchen today!
Print
Pear Tart with Sliced Hasselback Pears and Cream Cheese Filling Recipe
- Prep Time: 20 minutes
- Cook Time: 35 minutes
- Total Time: 55 minutes
- Yield: 8 servings
- Category: Dessert
- Method: Baking
- Cuisine: French
Description
A beautifully elegant pear tart featuring a flaky puff pastry crust, an indulgent cream cheese layer, and thinly sliced, sugar-glazed pears arranged in a delicate fan. This dessert combines subtle sweetness and buttery textures, finished with a sprinkle of turbinado sugar for a caramelized crunch.
Ingredients
Pastry and Topping
- 1 sheet frozen puff pastry, thawed, unfolded, and lightly rolled
- 1 tablespoon turbinado sugar
- 2 tablespoons white sugar
- ½ lemon, juiced
Pear Filling
- 2 Bartlett pears, halved and cored
- 2 d’Anjou pears, halved and cored
- 1 red pear, halved and cored
Cream Cheese Layer
- ½ (8 ounce) package cream cheese, softened
- ½ cup confectioners’ sugar
- ½ teaspoon vanilla extract
Instructions
- Preheat Oven: Preheat the oven to 400°F (200°C). Fit the thawed puff pastry sheet into a 10-inch square tart pan with removable sides, pressing gently to line the pan evenly.
- Prepare Pears: Place each pear half cut-side down on a work surface. Using chopsticks on each side of the pear, thinly slice lengthwise without cutting through the bottom, creating the classic ‘hasselback’ look. Repeat this for all pear halves.
- Coat Pears: Transfer the hasselbacked pears to a bowl, add white sugar and lemon juice, and gently toss to coat. Let the pears sit for 5 minutes to absorb the flavors and soften slightly.
- Make Cream Cheese Layer: In a bowl, combine softened cream cheese, confectioners’ sugar, and vanilla extract until smooth and creamy. Spread this mixture evenly over the lined puff pastry in the tart pan.
- Arrange Pears: Fan out the sliced pears carefully over the cream cheese layer in the pastry shell. Drizzle any accumulated juice from the pears over the arranged fruit to enhance flavor and moisture.
- Add Sugar Topping and Bake: Sprinkle turbinado sugar evenly over the pear-topped tart. Bake in the preheated oven for 35 minutes or until the puff pastry crust is puffed, golden brown, and the pear juices are bubbling.
- Cool and Serve: Remove the tart from the oven and let it cool briefly before slicing into 8 servings. Serve warm or at room temperature for best flavor.
Notes
- Using multiple varieties of pears adds complexity and visual appeal.
- Chopsticks help to protect the bottom of the pears when slicing thinly without cutting all the way through.
- Letting the pear slices soak in lemon juice and sugar helps prevent browning and adds brightness.
- Allow the tart to cool slightly to let the juices thicken for easier slicing.
- The tart pairs wonderfully with a dollop of whipped cream or vanilla ice cream.


