
“`html
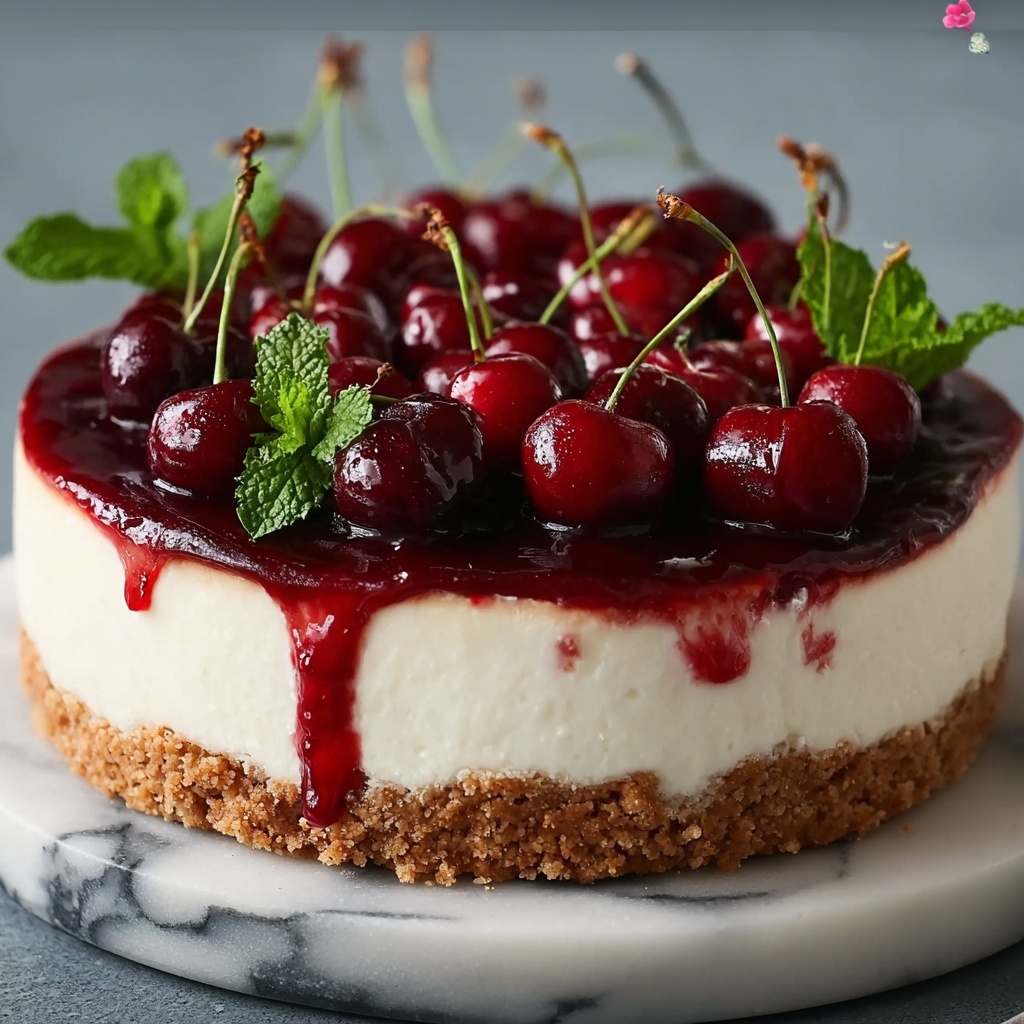
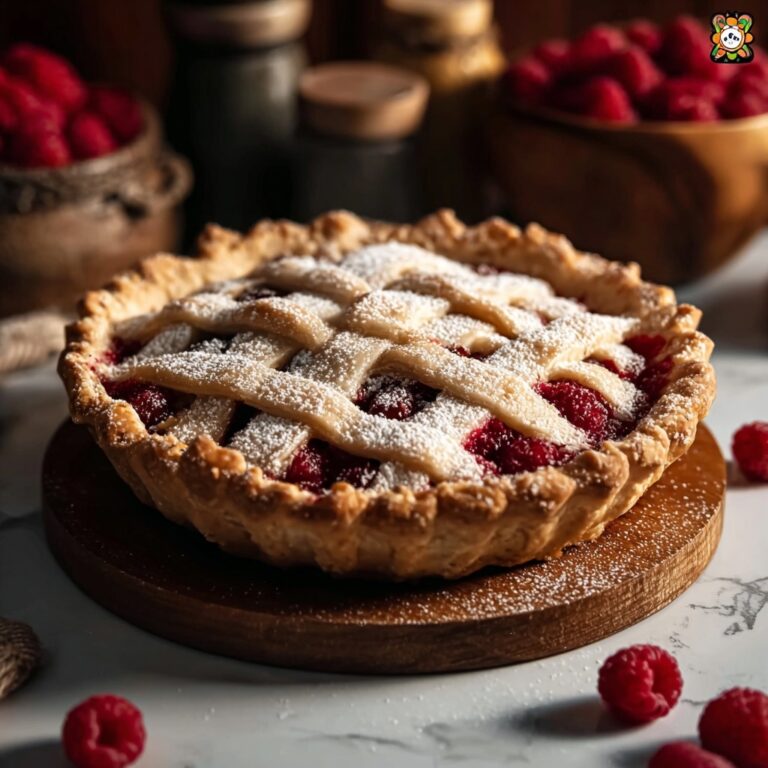
If you’re looking for a dessert that’s both stunningly beautiful and incredibly easy to make, this No-Bake Cherry Cheesecake Recipe is your new best friend. Imagine a silky smooth, creamy cheesecake filling resting on a perfectly buttery graham cracker crust, all topped with luscious, jewel-red cherry pie filling that bursts with sweet-tart flavor. It’s one of those recipes that feels fancy enough to impress but simple enough to whip up on a weeknight or for a last-minute gathering. Trust me, once you try this No-Bake Cherry Cheesecake Recipe, it will quickly become a favorite for any occasion.
Ingredients You’ll Need
The beauty of this No-Bake Cherry Cheesecake Recipe lies in its straightforward ingredients. Each item plays a crucial role in building flavor, texture, and that classic cheesecake appeal without turning on your oven. From the crunchy, buttery crust to the creamy, airy filling and the vibrant cherry topping, every single component is essential for that perfect bite.
- Graham crackers (2 cups, crushed): These form the crunchy, slightly sweet base that soaks up the butter and holds everything together beautifully.
- Butter (1/2 cup, melted): Adds richness and helps bind the crust so it sets firm and sliceable.
- Sugar (2 tablespoons for crust): Just a touch of sweetness to balance the buttery crust and enhance flavor.
- Cream cheese (16 oz, softened): The star of the cheesecake filling, giving it that rich and tangy personality we all love.
- Heavy cream (1 cup, cold): Whipped to soft peaks, it lightens the filling, making it fluffy and dreamy rather than dense.
- Sugar (1 cup, granulated for filling): Sweetens the cheesecake filling naturally without overpowering.
- Vanilla extract (1 teaspoon): Brings warmth and depth to the cheesecake flavor.
- Cherry pie filling (1 can, 21 oz): The crowning glory—juicy, sweet, and vibrant cherries that add that perfect pop of color and freshness.
How to Make No-Bake Cherry Cheesecake Recipe
Step 1: Prepare the Graham Cracker Crust
Start by crushing those graham crackers until they resemble fine crumbs. You can blitz them in a food processor or crush them inside a sealed bag using a rolling pin—it’s oddly satisfying! Next, stir in the melted butter and sugar until the mixture feels like wet sand. This texture is key for a crust that holds well. Firmly press this mix into the bottom of a 9-inch pie pan or springform pan and pop it into the fridge for at least 20 minutes. This chilling step helps it set perfectly, creating a sturdy base for your cheesecake filling.
Step 2: Make the Cheesecake Filling
The magic truly happens here. Beat the softened cream cheese until creamy and smooth with a hand mixer—no lumps allowed! Add in the sugar and vanilla extract, mixing it all into a luscious, sweet cream. In a separate cold bowl, whip the heavy cream until soft peaks form—that’s when the cream holds its shape but still feels soft and billowy. Gently fold this whipped cream into the cream cheese mixture; this is the secret to achieving that airy, melt-in-your-mouth cheesecake texture you’ll adore.
Step 3: Assemble the Cheesecake
Pour your dreamy cheesecake filling over the chilled graham crust, smoothing the top evenly with a spatula. Cover the cheesecake with plastic wrap or aluminum foil, then refrigerate for at least 3 to 4 hours. For even better results, let it chill overnight. This waiting period is essential for the cheesecake to fully set and develop flavor, making your patience well worth it.
Step 4: Add the Cherry Topping
Just before serving, spread the vibrant cherry pie filling evenly on top of the cheesecake. This final touch brings a burst of color and a sweet-tart contrast that makes every bite delightful. If you want to get fancy, add garnishes like whipped cream, fresh cherries, or even a sprinkle of chocolate shavings to elevate your presentation and flavor even more.
How to Serve No-Bake Cherry Cheesecake Recipe

Garnishes
To make your No-Bake Cherry Cheesecake Recipe pop visually and taste-wise, top it with smooth dollops of whipped cream or scatter some fresh cherries over the cherry topping. A light dusting of chocolate shavings or toasted nuts can add an exciting texture contrast that your guests will love.
Side Dishes
This cheesecake pairs wonderfully with light, fresh accompaniments. Consider serving it alongside some fresh berries or a crisp mint salad for contrast. A cup of coffee or a refreshing iced tea also complements the richness perfectly without overwhelming the palate.
Creative Ways to Present
If you want to impress, slice your cheesecake into neat wedges and serve each piece on elegant dessert plates. For a more casual vibe, cut it into small squares and arrange on a platter for sharing. You can also prepare mini versions in individual ramekins for personalized charm. No matter how you present it, your No-Bake Cherry Cheesecake Recipe will look irresistible.
Make Ahead and Storage
Storing Leftovers
Leftover cheesecake? Absolutely a winner snack! Keep your No-Bake Cherry Cheesecake covered tightly with plastic wrap in the fridge for up to 3 days. This will maintain its luscious texture and keep the cherry topping fresh, so you can enjoy it as if it’s freshly made.
Freezing
If you want to make this cheesecake ahead of time or store it longer, it freezes beautifully. Wrap the whole cheesecake or individual slices securely in plastic wrap and then in aluminum foil to prevent freezer burn. Freeze it for up to one month. When you’re ready, thaw overnight in the refrigerator for the best taste and texture.
Reheating
Since this is a no-bake cheesecake, it is best served chilled. Reheating is not recommended as it will change the creamy texture. Simply allow frozen slices to thaw gently in the fridge before serving to enjoy the perfect consistency.
FAQs
Can I use a different crust for the No-Bake Cherry Cheesecake Recipe?
Definitely! While graham crackers are classic, you can substitute with crushed digestive biscuits, vanilla wafers, or even gingersnaps for a spicy twist. Just make sure to mix them with melted butter and chill as usual to get that perfect crust.
Is it possible to make this cheesecake dairy-free?
For a dairy-free version, swap out cream cheese and heavy cream with plant-based alternatives such as vegan cream cheese and coconut cream. The texture may vary slightly, but the result is still wonderfully creamy and delicious.
How long does it take to set properly?
To achieve the ideal texture, allow the No-Bake Cherry Cheesecake Recipe to chill for at least 3 to 4 hours. Overnight chilling yields the best setting and flavor development, so if you have the time, let it sit longer.
Can I use fresh cherries instead of cherry pie filling?
Yes! Fresh cherries can be used but will need to be prepared into a topping with sugar and maybe a bit of lemon juice or cornstarch to thicken. This option gives a more natural, less sweet topping and adds a lovely fresh fruit brightness.
Will the crust get soggy over time?
Since the crust sits under the creamy filling and is chilled, it generally stays nicely firm. However, to avoid sogginess, ensure the crust is well compacted and chilled before adding the filling. Eating the cheesecake within a few days is best to enjoy the perfect texture.
Final Thoughts
This No-Bake Cherry Cheesecake Recipe truly is a gem in any dessert lover’s collection. It combines luscious creaminess with a sweet, tangy cherry topping and a satisfyingly crunchy crust—all without turning on the oven. Whether you’re making it for a special occasion or simply treating yourself, this cheesecake will not disappoint. So, roll up your sleeves, gather the ingredients, and get ready to enjoy a slice of pure joy!
“`
Print
No-Bake Cherry Cheesecake Recipe
- Prep Time: 20 minutes
- Cook Time: 0 minutes
- Total Time: 4 hours 20 minutes
- Yield: 8 servings
- Category: Dessert
- Method: No-Cook
- Cuisine: American
Description
This No-Bake Cherry Cheesecake is a delicious and easy-to-make dessert featuring a buttery graham cracker crust, a creamy and airy cream cheese filling, and a sweet cherry pie topping. Perfect for warm days or when you want a decadent treat without turning on the oven.
Ingredients
For the Crust:
- 2 cups graham crackers, crushed
- 1/2 cup butter, melted
- 2 tablespoons sugar
For the Cheesecake Filling:
- 16 oz cream cheese, softened
- 1 cup heavy cream, cold
- 1 cup granulated sugar
- 1 teaspoon vanilla extract
For the Topping:
- 1 can (21 oz) cherry pie filling
Instructions
- Prepare the Graham Cracker Crust: Crush graham crackers into fine crumbs using a food processor or by placing them in a resealable bag and crushing with a rolling pin. Mix the crumbs with melted butter and sugar until the texture resembles wet sand. Press the mixture firmly into the bottom of a 9-inch pie pan or springform pan. Chill the crust in the refrigerator for 20 minutes to set.
- Make the Cheesecake Filling: In a mixing bowl, beat the softened cream cheese until smooth and creamy using a hand mixer. Add sugar and vanilla extract, mixing well. In a separate chilled bowl, whip the heavy cream until soft peaks form. Gently fold the whipped cream into the cream cheese mixture until fully combined, ensuring the mixture remains light and airy.
- Assemble the Cheesecake: Pour the cheesecake filling over the chilled crust, smoothing the top with a spatula. Cover the pan with plastic wrap or aluminum foil and refrigerate for at least 3-4 hours, or overnight for best results to allow the cheesecake to set properly.
- Add the Cherry Topping: Spread the cherry pie filling evenly over the top of the chilled cheesecake just before serving. Garnish with whipped cream, fresh cherries, or chocolate shavings if desired for an elegant presentation and added flavor.
Notes
- For best texture, ensure the cream cheese is fully softened before mixing.
- Chilling the crust before adding the filling helps keep it firm and prevents sogginess.
- The cheesecake can be refrigerated up to 24 hours before serving; add the cherry topping right before serving to keep it fresh.
- Use cold heavy cream for better whipping results.
- If you prefer a firmer crust, add a tablespoon of crushed nuts or use a springform pan for easy removal.
