
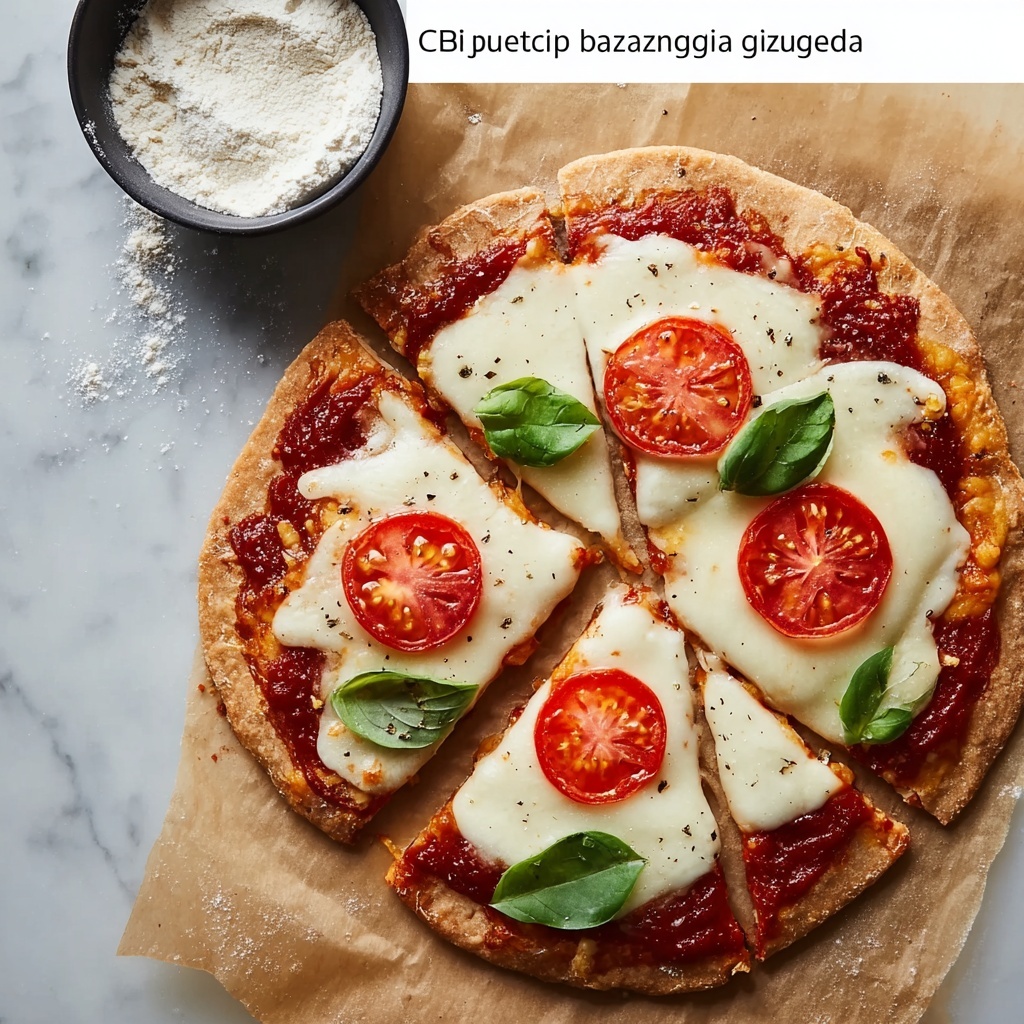
If you’ve been on the hunt for the perfect gluten-free pizza base that doesn’t compromise on flavor or texture, I’m thrilled to share this Crispy Coconut Flour Pizza Crust You’ll Crave Every Night Recipe. This crust is a game-changer—it manages to be perfectly crispy on the outside while tender inside, all thanks to the magic of coconut flour. Whether you’re a seasoned pizza lover or just experimenting with grain-free options, this recipe delivers a wonderfully satisfying foundation for all your favorite toppings, promising many delicious nights ahead.
Ingredients You’ll Need
Believe it or not, this Crispy Coconut Flour Pizza Crust You’ll Crave Every Night Recipe relies on a handful of simple yet essential ingredients. Each one plays a key role—from the coconut flour providing natural sweetness and structure, to the egg whites lending that much-needed lift and stability, creating a crust that’s both crisp and tender.
- 1 cup Coconut flour: A gluten-free flour that gives a subtle sweetness and absorbs moisture wonderfully.
- 1 teaspoon Baking powder: Ensures the crust rises and gains a light, airy texture.
- 1 teaspoon Garlic powder: Adds an aromatic savory note that infuses each bite with flavor.
- 1 teaspoon Onion powder: Compliments the garlic for a well-rounded savory profile.
- 1 teaspoon Salt: Enhances and balances the flavors perfectly.
- 3 large Egg whites: Provides structure and a delicate lift, keeping the crust light.
- 2 tablespoons Olive oil: Gives a rich flavor and contributes to the crust’s crispiness.
How to Make Crispy Coconut Flour Pizza Crust You’ll Crave Every Night Recipe
Step 1: Preheat and Prepare
Start by preheating your oven to a cozy 350°F so it’s ready when you are. Preparing your baking pans is just as important—line two 8-inch round cake pans with parchment paper to make removing the crusts a breeze later on.
Step 2: Mix Dry Ingredients
Sift together the coconut flour, baking powder, garlic powder, and onion powder into a large mixing bowl. Sifting makes sure those dry ingredients blend evenly and prevents any lumps, ensuring every bite is consistent.
Step 3: Whip Egg Whites
Using a stand mixer, beat the egg whites and salt on medium-high speed until soft peaks form. This step is crucial because it introduces air that will help your crust achieve that perfect rise and tender texture.
Step 4: Incorporate Dry and Wet Ingredients
Gently fold the sifted dry ingredient mixture into the whipped egg whites. Beat until just well combined to keep the airiness intact. Follow this by mixing in the olive oil, which adds richness and helps crisp up the crust beautifully.
Step 5: Bake the Crust
Divide the batter evenly between your prepared pans, then place them in the oven. Bake for 15 to 20 minutes until the edges turn golden and the crust feels firm to the touch. This forms the base that is both sturdy and delightful.
Step 6: Cool and Remove
Once out of the oven, allow the crusts to cool slightly. This helps them set properly and makes peeling away the parchment paper easier without breaking the crusts.
Step 7: Final Crisp and Top
Preheat your oven again to 400°F, placing a pizza stone on a lower rack. Add your favorite cooked meats or veggies on top of each crust and bake for another 4-5 minutes. This step melts the toppings and crisps the crust to perfection.
How to Serve Crispy Coconut Flour Pizza Crust You’ll Crave Every Night Recipe

Garnishes
Fresh herbs like basil, oregano, or even a sprinkle of chili flakes take this pizza crust to the next level. Adding a drizzle of extra virgin olive oil or a dusting of nutritional yeast can also give a gourmet touch without overwhelming the natural flavors.
Side Dishes
Pair this crust with a crisp green salad tossed in lemon vinaigrette or roasted garlic green beans for a light and satisfying meal. Even a bowl of tangy tomato soup complements this crust’s subtle sweetness and savory seasoning beautifully.
Creative Ways to Present
Think outside the box by cutting your pizza into bite-sized squares for party platters or rolling slices with fresh mozzarella and basil for pizza roll-ups. You could even create mini personal pizzas using muffin tins—each little crust topped and baked separately makes a fun, inviting presentation for guests.
Make Ahead and Storage
Storing Leftovers
If you happen to have crusts left over, wrap them tightly in plastic wrap or store in an airtight container in the fridge for up to 3 days. This helps maintain their texture and keeps them fresh for your next pizza craving.
Freezing
You can freeze baked crusts for up to a month. Just make sure to separate layers with parchment paper and seal them in a freezer-safe bag to avoid freezer burn. When you’re ready, thaw them in the fridge overnight before adding toppings and warming up.
Reheating
To bring back that sought-after crispness, reheat your crusts in a 350°F oven for about 5-7 minutes. Avoid microwaving, as it tends to make the crust soggy instead of maintaining that delightful crunch.
FAQs
Can I make this crust dairy-free?
Absolutely! This recipe is already dairy-free, featuring coconut flour and olive oil as the main fat sources, so it’s perfect for anyone avoiding dairy.
Is coconut flour suitable for people with nut allergies?
Coconut is technically a fruit, not a tree nut, but some people with nut allergies should still approach with caution. Always check with your healthcare provider if you have concerns.
Can I double the recipe for a larger pizza?
Yes, doubling works well. Just be sure to use a larger pan or two pans to maintain even baking and crispiness.
What toppings complement this crust best?
Because the crust offers subtle sweetness and savory notes, toppings like caramelized onions, fresh tomatoes, spinach, grilled chicken, or sharp cheeses work beautifully.
Will this crust be crispy without the final high-temp bake?
The initial bake forms the crust, but the second, hotter baking step is what truly crisps it up. Skipping it might leave the crust a bit softer than intended.
Final Thoughts
This Crispy Coconut Flour Pizza Crust You’ll Crave Every Night Recipe has quickly become a staple in my kitchen. It’s amazing how a few simple ingredients can come together to create such a flavorful, crispy crust that’s perfect for all your favorite toppings. I truly can’t wait for you to try it and enjoy pizza night on a whole new level—happy baking!
Print
Crispy Coconut Flour Pizza Crust You’ll Crave Every Night Recipe
- Prep Time: 10 minutes
- Cook Time: 25 minutes
- Total Time: 35 minutes
- Yield: 2 crusts (serves 2)
- Category: Pizza
- Method: Baking
- Cuisine: American
- Diet: Gluten Free
Description
This Crispy Coconut Flour Pizza Crust recipe offers a delicious, gluten-free alternative to traditional pizza bases. Made with coconut flour and egg whites, it is light, crispy, and slightly sweet, perfect for a night when you crave a flavorful and healthy pizza crust. Easy to prepare and bake, this crust crisps up beautifully with your favorite toppings for a satisfying meal.
Ingredients
Dry Ingredients
- 1 cup Coconut flour (A gluten-free flour that gives a subtle sweetness)
- 1 teaspoon Baking powder (Ensures the crust rises)
- 1 teaspoon Garlic powder (Adds an aromatic savory note)
- 1 teaspoon Onion powder (Compliments the garlic flavor)
- 1 teaspoon Salt (Enhances the flavors)
Wet Ingredients
- 3 large Egg whites (Provides structure)
- 2 tablespoons Olive oil (Gives a rich flavor)
Instructions
- Preheat Oven: Preheat your oven to 350°F to create the ideal temperature for baking the coconut flour crust evenly.
- Prepare Pans: Line two 8-inch round cake pans with parchment paper to prevent sticking and ensure easy removal of the crusts.
- Mix Dry Ingredients: Sift together the coconut flour, baking powder, garlic powder, and onion powder in a mixing bowl to combine and aerate them for a fluffy crust.
- Beat Egg Whites and Salt: Using a stand mixer, beat the egg whites with the salt on medium-high speed until soft peaks form, which will help give the crust its structure and lightness.
- Combine Mixtures: Gently fold the sifted dry ingredients into the beaten egg whites, mixing until fully blended without deflating the whites.
- Add Olive Oil: Mix in the olive oil thoroughly to enrich the batter and add moisture for a tender crust.
- Divide Batter: Evenly distribute the batter between the two prepared pans, smoothing the surface for even baking.
- Bake First Phase: Bake the crusts in the preheated oven at 350°F for 15-20 minutes until they are set and lightly golden.
- Cool Slightly: Allow the crusts to cool briefly to make handling easier and prevent breaking.
- Remove Crusts: Carefully peel away the parchment paper from the crusts.
- Preheat Oven Again: Increase the oven temperature to 400°F and place a pizza stone on a lower rack to prepare for final crisping and topping heating.
- Add Toppings: Top each crust with your favorite cooked meats or vegetables, distributing evenly for balanced flavor.
- Bake Final Phase: Bake for another 4-5 minutes at 400°F on the pizza stone until the toppings are heated through and the crust is crispy.
Notes
- Using coconut flour makes the crust gluten-free and adds a slight natural sweetness.
- Beating the egg whites until soft peaks helps create a light and airy crust texture.
- The initial baking step sets the crust before adding toppings.
- Finishing on a hot pizza stone crisps up the crust and heats toppings perfectly.
- Customize toppings according to dietary preferences or available ingredients.


