
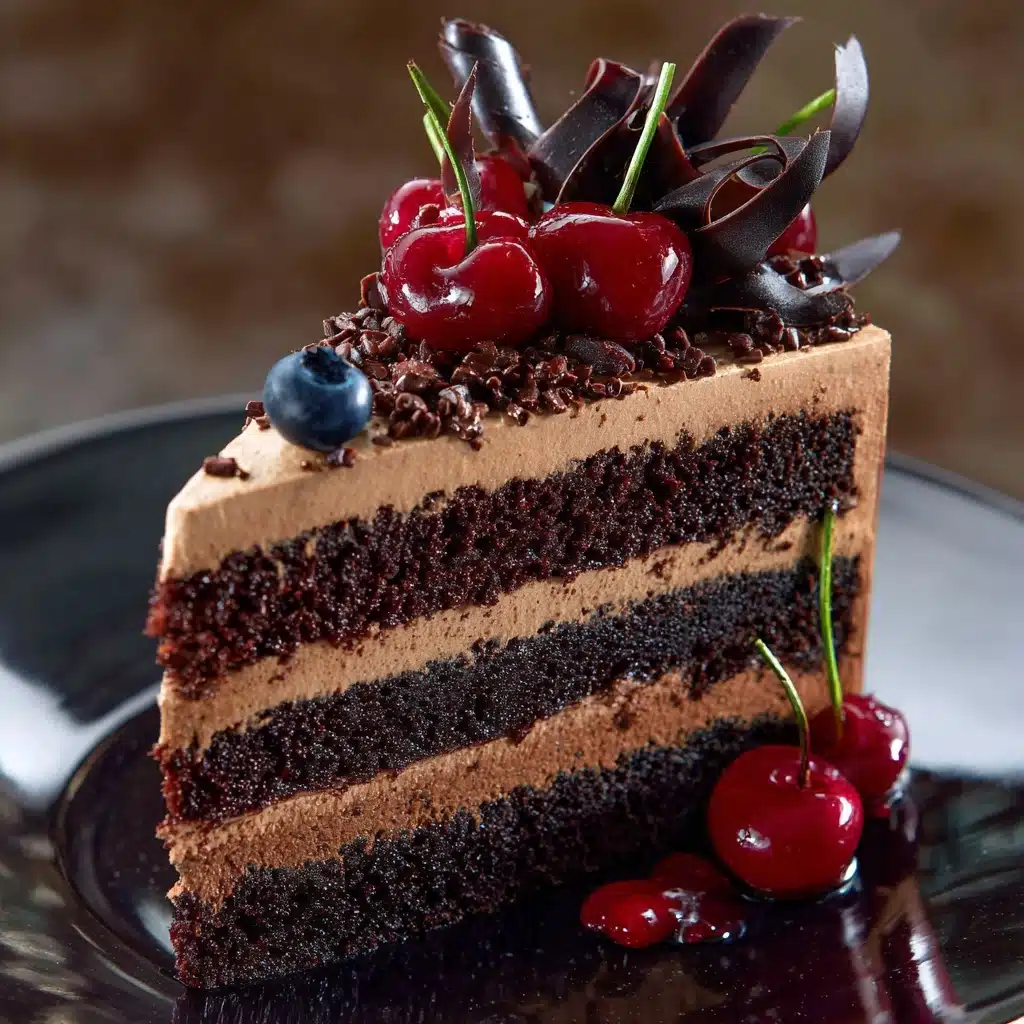
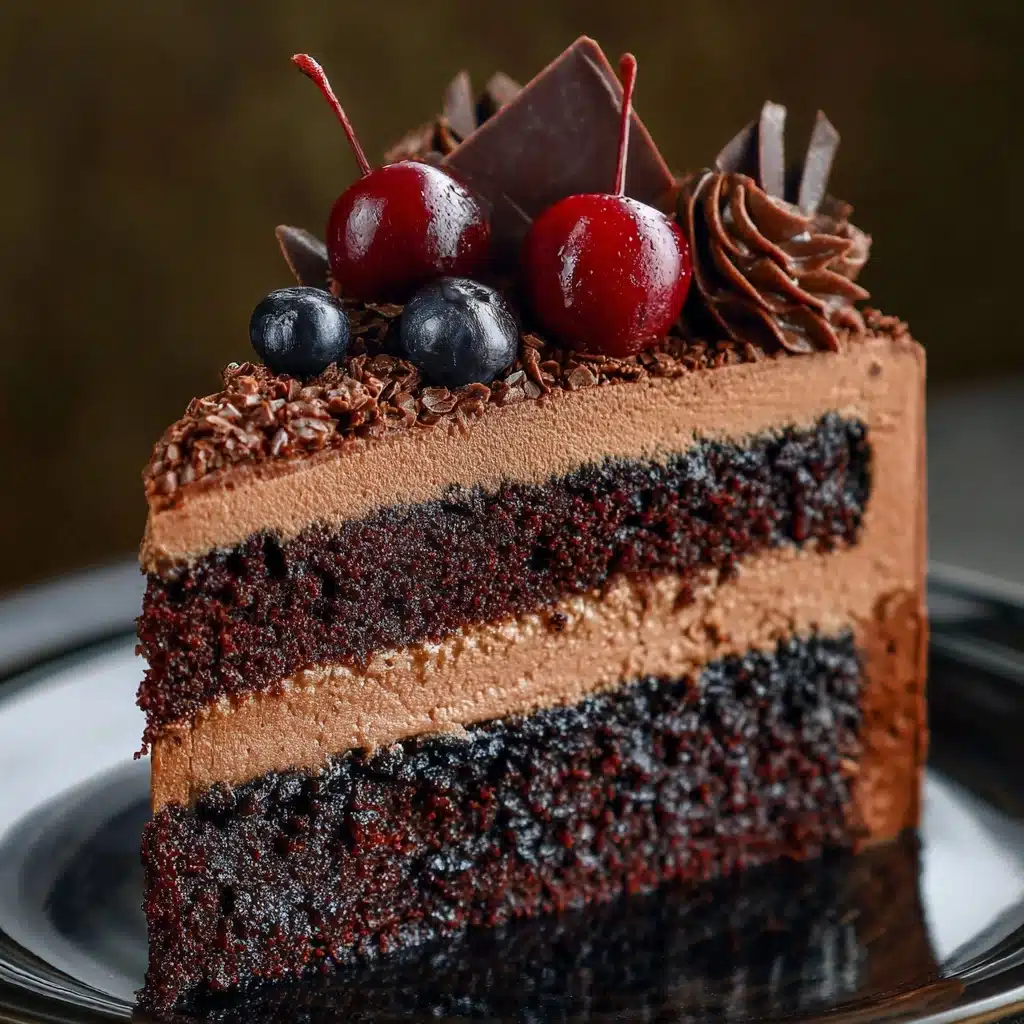
If you’re searching for a showstopping dessert that combines rich chocolate, luscious cherries, and fluffy clouds of whipped cream, look no further than Chocolate Forest Cake. With its irresistible layers and beautiful presentation, this European-inspired treat is a celebration cake for any occasion. Whether you grew up swooning over Black Forest flavors or simply crave the ultimate chocolate-cherry combination, this Chocolate Forest Cake delivers pure joy in every decadent bite.
Ingredients You’ll Need
The magic of Chocolate Forest Cake comes from simple, standout ingredients—each one adding its own spark to the final masterpiece. Gather these pantry staples and a few fresh finds, and you’re on your way to dessert bliss!
- All-purpose flour: Gives the cake its tender, yet sturdy structure to hold all those luscious layers.
- Unsweetened cocoa powder: Delivers that deep, chocolatey flavor—it’s the soul of the cake.
- Granulated sugar: Adds just the right touch of sweetness to balance the cocoa’s intensity.
- Baking powder and baking soda: This power duo helps the cake rise and stay beautifully soft.
- Salt: A small pinch sharpens all the cake’s rich flavors.
- Large eggs: Bind everything together and add moisture for a plush crumb.
- Buttermilk: Gives a subtle tang and keeps the cake ultra-moist—trust me, it makes a difference!
- Vegetable oil: Adds richness and helps the cake stay fresh and soft.
- Vanilla extract: Gives warmth and depth to both cake and whipped cream.
- Hot water or brewed coffee: Intensifies the chocolate flavor and creates a silky, light batter. Coffee is a game changer if you love deep cocoa notes!
- Cherry pie filling or sweet cherries: The star of the fruit layer—pick whichever fits your mood or season.
- Cornstarch (if using fresh cherries): Thickens the cherry filling beautifully, so it stays nestled between cake layers.
- Sugar (for fresh cherries): Just enough to sweeten and boost the natural cherry flavor.
- Heavy whipping cream: Whipped to dreamy peaks for frosting you’ll want to eat by the spoonful.
- Powdered sugar: Sweetens and stabilizes the whipped cream frosting.
- Chocolate shavings or curls: Adds the “forest” look and irresistible texture—use a veggie peeler for curls!
- Fresh cherries (optional): For that final, festive flourish on top.
How to Make Chocolate Forest Cake
Step 1: Prep the Pans and Preheat
Your journey to a perfect Chocolate Forest Cake begins with a little preparation. Grease and flour two 9-inch round cake pans for easy cake release later—there’s nothing more satisfying than flipping out perfectly intact cake layers! Preheat your oven to 350°F (175°C) while you assemble your ingredients.
Step 2: Mix the Dry Ingredients
In a large bowl, whisk together flour, cocoa powder, granulated sugar, baking powder, baking soda, and salt. Mixing these dry ingredients first ensures your leaveners are evenly distributed, which means a consistently risen, ultralight cake.
Step 3: Combine Wet Ingredients
Add the eggs, buttermilk, oil, and vanilla extract to the dry mixture. Beat until just combined. For the final flourish, slowly blend in the hot water or coffee. The batter will be thin—don’t worry! That’s what makes the cake so light and moist.
Step 4: Bake Your Layers
Pour the batter evenly into your prepared pans. Slide them into the oven and bake for 30 to 35 minutes, or until a toothpick inserted in the center comes out clean. Let the cakes cool in the pans for about 10 minutes, then carefully turn them out onto wire racks to cool completely. The aroma filling your kitchen at this point is a reward all its own!
Step 5: Prepare the Cherry Filling
If you’re using canned cherry pie filling, you’re all set! For a fresher take, cook pitted sweet cherries with a little sugar and cornstarch until thickened and jammy. (Taste as you go to adjust the sweetness—nothing beats homemade cherry filling in a Chocolate Forest Cake!) Allow it to cool before assembly.
Step 6: Whip Up the Whipped Cream
Using a hand mixer or stand mixer, whip the heavy cream, powdered sugar, and vanilla extract until stiff peaks form. This creamy cloud is what sets Chocolate Forest Cake apart—so whip until it’s firm but still luscious.
Step 7: Assemble Those Gorgeous Layers
When the cakes are cool, slice each in half horizontally so you have four thin layers. Place one layer on your prettiest serving plate, then spread with cherry filling and a swoosh of whipped cream. Repeat with all the layers, finishing the top and sides with the remaining whipped cream. It’s a messy, fun process—don’t stress perfection, just embrace the beauty!
Step 8: Garnish and Chill
Shower the cake with chocolate shavings or curls for serious “forest” magic, and scatter a few fresh cherries if you like. Chill your masterpiece for at least 1 hour so everything melds. Now you’ve got a Chocolate Forest Cake truly worthy of a special occasion—or any day you want to make extraordinary!
How to Serve Chocolate Forest Cake
Garnishes
The crowning glory of Chocolate Forest Cake truly lies in those finishing touches. Pile on a tumble of shiny chocolate curls for a rustic, woodsy vibe. Dot with glossy, fresh cherries for a pop of color and flavor, and dust the cake with a veil of powdered sugar for vintage charm. Each garnish adds both beauty and taste, making every slice a mini celebration.
Side Dishes
This cake is a star on its own, but if you wish to impress, serve it alongside espresso or a bold cup of coffee—nothing pairs better with chocolate and cherries! For a lighter option, a plate of mixed berries or a tangy cherry sorbet can echo and brighten the fruit notes.
Creative Ways to Present
The drama of a whole Chocolate Forest Cake is classic, but you can easily make it even more fun. Try assembling mini cakelets in jars or glasses for individual servings—just layer cake cubes, cherry filling, and whipped cream. Or, serve thin wedges on elegant plates, garnished with a drizzle of cherry syrup and a sprig of mint. Any way you slice or style it, this cake will steal the show!
Make Ahead and Storage
Storing Leftovers
Store any leftover Chocolate Forest Cake well covered in the refrigerator, where it will keep beautifully for up to 3 days. Pro tip: a cake dome or a large airtight container helps protect the whipped cream, ensuring every forkful stays as dreamy as the first.
Freezing
You can freeze the plain cake layers ahead of time (just wrap thoroughly in plastic and foil). For fully assembled cake, freezing isn’t ideal due to the whipped cream, but single slices can go in a sealed container for a quick homemade treat—just thaw gently in the fridge before eating.
Reheating
Chocolate Forest Cake is best enjoyed cold or at room temperature—no need for reheating! If you’ve frozen slices, simply let them defrost in the refrigerator overnight for the best texture. The flavors actually deepen and mingle after a day or two, making those leftovers even more magical.
FAQs
Can I make Chocolate Forest Cake in advance?
Absolutely! You can bake the cake layers up to 2 days ahead and store them tightly wrapped. Assemble with whipped cream and cherries on the day of serving to keep everything fresh and fluffy.
What’s the difference between chocolate forest cake and black forest cake?
While both cakes feature the delicious combo of chocolate, cherries, and cream, Chocolate Forest Cake lets you play with simpler, modern ingredients (like cherry pie filling) instead of strictly following European traditions. It’s a homemade twist inspired by the classic, but a little easier for home bakers!
Can I use frozen cherries for the filling?
Yes, frozen cherries work wonderfully! Just cook them down with sugar and cornstarch as you would fresh cherries, remembering to drain any excess juice. Your filling will be bursting with real cherry flavor.
How do I make chocolate curls for garnish?
Use a vegetable peeler on a bar of room-temperature chocolate to create beautiful shavings or curls. They add a fun texture and make your Chocolate Forest Cake look like it came from a fancy bakery!
Is there a non-dairy version of this cake?
You can swap buttermilk for your favorite non-dairy milk with a splash of lemon juice, use coconut cream for frosting, and choose egg-free cake recipes if needed. The chocolate-cherry magic still shines through with any adaptations!
Final Thoughts
If you’re searching for a dessert that’s decadent, beautiful, and downright joyful to share, Chocolate Forest Cake is pure magic. Each bite is rich, creamy, and bursting with cherry brightness—just the thing to bring people together. Give it a try, and get ready for big smiles around your table!
Print
Chocolate Forest Cake Recipe
- Total Time: 1 hour 5 minutes (plus chilling)
- Yield: 12 servings 1x
- Diet: Vegetarian
Description
Indulge in this decadent Chocolate Forest Cake, a delightful twist on the classic Black Forest Cake. Layers of moist chocolate cake sandwiched with cherry filling and fluffy whipped cream frosting, topped with chocolate shavings and fresh cherries.
Ingredients
For the chocolate cake:
- 1 3/4 cups all-purpose flour
- 3/4 cup unsweetened cocoa powder
- 2 cups granulated sugar
- 1 1/2 teaspoons baking powder
- 1 1/2 teaspoons baking soda
- 1 teaspoon salt
- 2 large eggs
- 1 cup buttermilk
- 1/2 cup vegetable oil
- 2 teaspoons vanilla extract
- 1 cup hot water or brewed coffee
For the cherry filling:
- 1 can (21 oz) cherry pie filling or 2 cups pitted sweet cherries with 2 tablespoons sugar and 1 tablespoon cornstarch (cooked until thickened)
For the whipped cream frosting:
- 2 cups heavy whipping cream
- 1/2 cup powdered sugar
- 1 teaspoon vanilla extract
For garnish:
- Chocolate shavings or curls
- Fresh cherries (optional)
Instructions
- Preheat oven to 350°F (175°C). Grease and flour two 9-inch round cake pans.
- In a large bowl, whisk together flour, cocoa powder, sugar, baking powder, baking soda, and salt. Add eggs, buttermilk, oil, and vanilla. Beat until well combined. Slowly mix in hot water or coffee until batter is smooth (it will be thin). Divide batter evenly between the prepared pans.
- Bake for 30–35 minutes or until a toothpick inserted in the center comes out clean. Cool in pans for 10 minutes, then transfer to wire racks to cool completely.
- While the cakes cool, prepare the whipped cream frosting by beating heavy cream, powdered sugar, and vanilla until stiff peaks form.
- Once cakes are cool, slice each layer in half horizontally to create four thin layers. Place one layer on a serving plate and spread with a portion of cherry filling. Add a layer of whipped cream. Repeat with remaining layers, finishing with whipped cream on top and sides.
- Garnish with chocolate shavings and fresh cherries. Chill for at least 1 hour before slicing.
Notes
- For a boozy twist, brush each layer with cherry liqueur or Kirsch before assembling.
- Store leftovers in the fridge for up to 3 days.
- Prep Time: 30 minutes
- Cook Time: 35 minutes
- Category: Dessert
- Method: Baking
- Cuisine: European-Inspired
Nutrition
- Serving Size: 1 slice
- Calories: 460
- Sugar: 36g
- Sodium: 290mg
- Fat: 25g
- Saturated Fat: 14g
- Unsaturated Fat: 9g
- Trans Fat: 0g
- Carbohydrates: 55g
- Fiber: 3g
- Protein: 5g
- Cholesterol: 80mg


