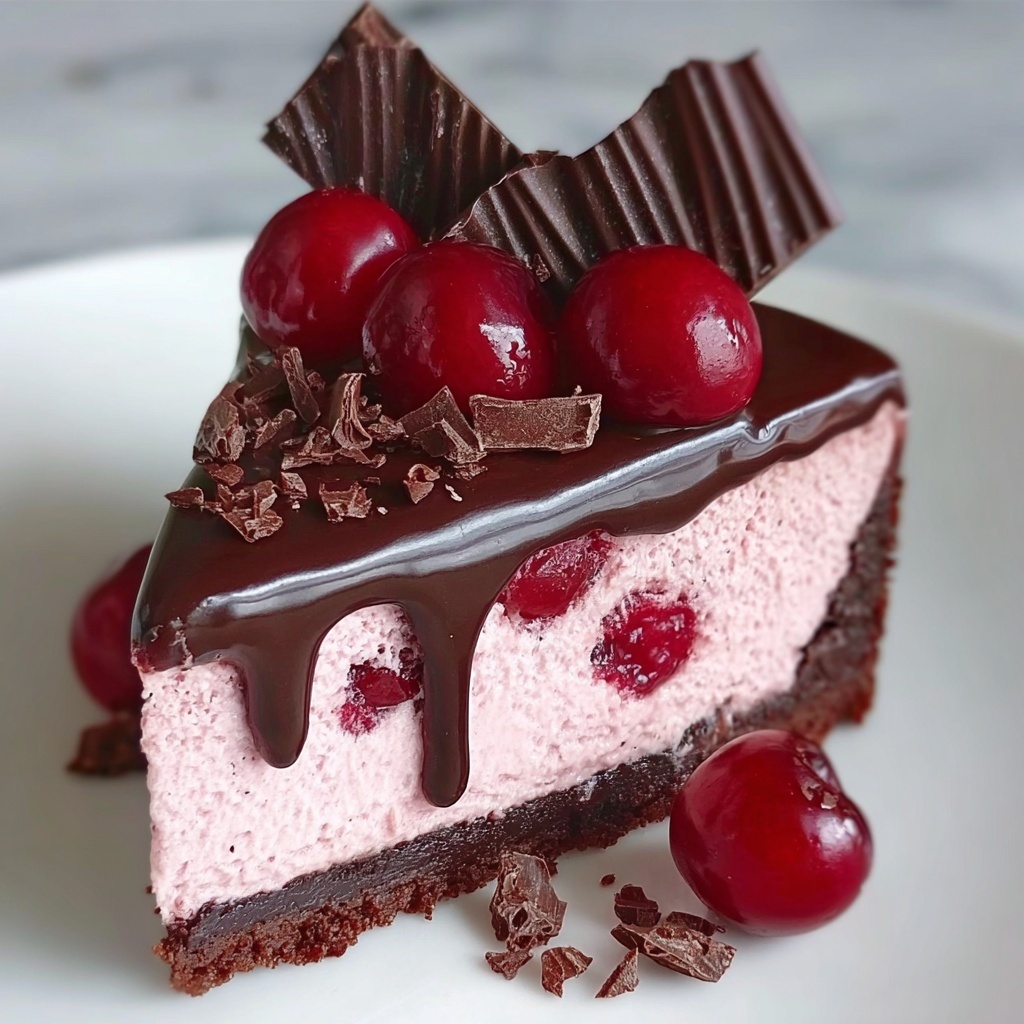
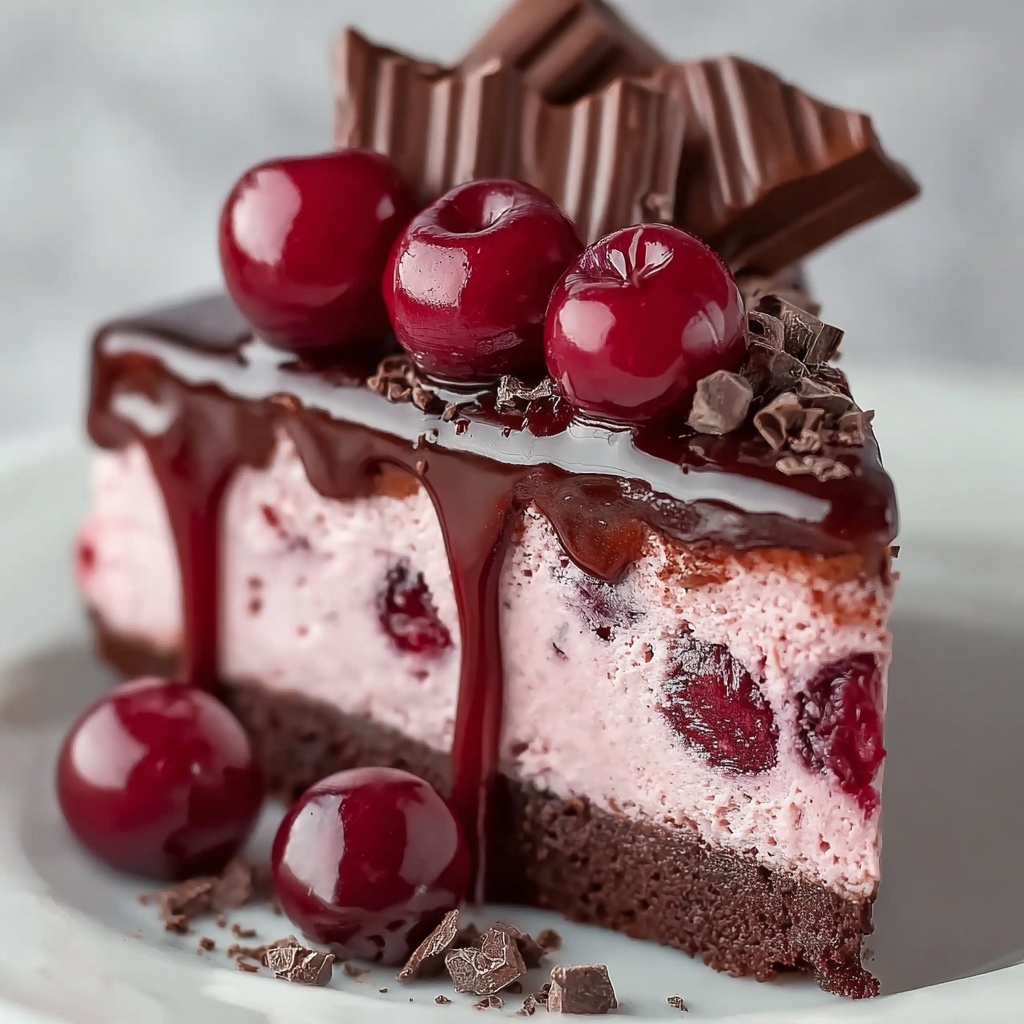
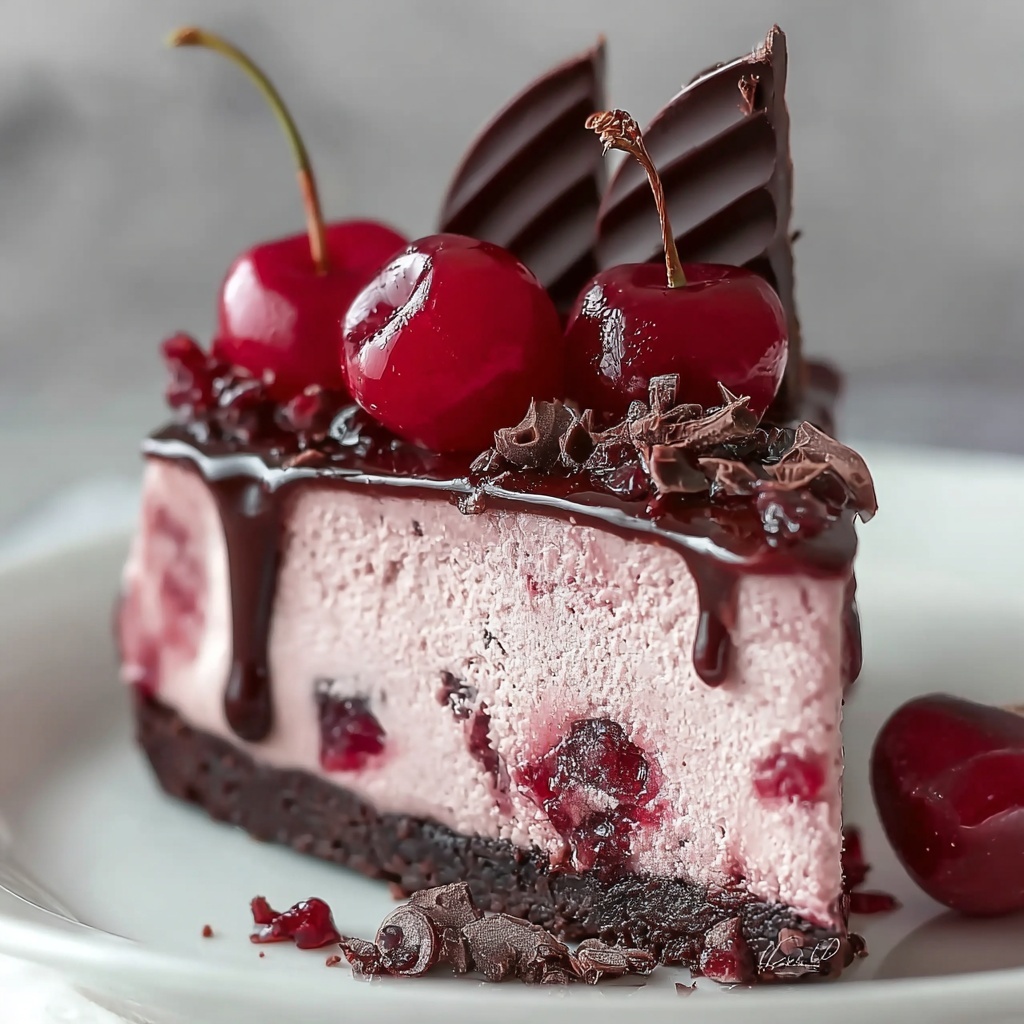
If you’re in the mood for something luscious and utterly irresistible without turning on the oven, this Chocolate Cherry No-Bake Cheesecake Recipe is your new best friend. Imagine a silky smooth chocolate cheesecake filling nestled on a crunchy Oreo crust, topped with a vibrant cherry sauce bursting with bright, tart sweetness—it’s the perfect balance of flavors and textures that will delight your taste buds and impress anyone lucky enough to share a slice.
Ingredients You’ll Need
Don’t let the rich, decadent taste of this cheesecake fool you: the ingredients list is refreshingly simple and approachable. Each component plays a key role in building the layers of flavor and texture, from the crunchy chocolate cookie crust to the fluffy, cocoa-kissed cheesecake filling and the tangy cherry topping.
- 16 Oreos or chocolate sandwich cookies (filling removed): These form the base’s irresistible chocolate crunch—make sure to remove the cream filling for a better crust texture.
- 1/4 teaspoon salt: Enhances and balances the sweetness in the crust.
- 1/4 cup melted butter: Binds the cookie crumbs into a firm, buttery crust.
- 1 1/2 cups heavy whipping cream: Whipped to fluffy perfection, it adds creamy airiness to the cheesecake filling.
- 1 envelope unflavored gelatin: Helps the cheesecake set perfectly without baking.
- 8 oz cream cheese, softened: The star of the filling, providing its signature tang and creamy richness.
- 1/2 cup powdered sugar: Adds gentle sweetness while blending smoothly into the filling.
- 1/4 cup Dutch-processed cocoa powder: Deepens the chocolate flavor with rich, smooth notes.
- 4 oz dark chocolate, melted: Intensifies chocolate goodness and adds a velvety texture.
- 1 teaspoon vanilla extract: Brings warmth and depth to the cheesecake’s flavor profile.
- 2 cups pitted cherries (fresh or frozen): The juicy, tart fruit that brightens and freshens the whole dessert.
- 1/4 cup sugar: Sweetness to balance the cherry’s natural tartness.
- 1 tablespoon cornstarch: Thickens the cherry sauce to a luscious consistency.
- 1 tablespoon lemon juice: Adds a subtle tang that enlivens the cherry sauce.
How to Make Chocolate Cherry No-Bake Cheesecake Recipe
Step 1: Crush the Cookies
Grab your food processor or a sturdy bag and rolling pin—the first step is to crush those Oreo cookies into fine, fragrant crumbs. Removing the filling ensures your crust stays perfectly textured, and mixing in a pinch of salt and melted butter will help everything stick together in the most delicious way.
Step 2: Form the Crust
Press your cookie mixture firmly into the bottom of a springform pan, creating an even crust layer. This base is the crunchy contrast your creamy filling will need, so take your time pressing it down well. Once done, set it aside while you work on the luscious filling.
Step 3: Dissolve the Gelatin
In a small microwave-safe bowl, combine half a cup of whipping cream with your unflavored gelatin powder. Let it absorb moisture for five minutes, then nuke it for one minute, stirring once midway. Allow this magical mixture to cool—it’s what turns your filling into a perfectly set cheesecake without baking.
Step 4: Make the Filling
Beat softened cream cheese, powdered sugar, Dutch-processed cocoa powder, and melted dark chocolate until silky smooth. This chocoholic’s dream forms the heart of your cheesecake. Slowly fold in the remaining whipped cream and vanilla extract to create a creamy, fluffy filling that’s light yet indulgent.
Step 5: Add Gelatin
Gradually blend the cooled gelatin mixture into your filling. This step is crucial for stability, ensuring every slice holds its shape with just the right softness—like a cloud of chocolate delight.
Step 6: Assemble and Chill
Pour this luscious filling over your prepared cookie crust, smoothing the surface with a spatula. Pop the whole thing into the refrigerator, letting it chill for at least four hours. Patience here pays off—you want a firm, sliceable cheesecake with no wobble but plenty of creamy softness.
Step 7: Cook the Cherry Sauce
While your cheesecake chills, combine the pitted cherries, sugar, cornstarch, and lemon juice in a saucepan. Stir over medium heat until the mixture boils and thickens into a glossy, rich sauce that perfectly complements your rich chocolate layers.
Step 8: Cool the Sauce
Let your cherry sauce cool to room temperature, then transfer it to the fridge so it can chill alongside your cheesecake. Serving it cold amplifies the contrast of flavors and textures when plated.
Step 9: Remove from Pan
When your cheesecake has set gloriously firm in the fridge, carefully release it from the springform pan. This moment is always a joyful reveal of your hard work’s beauty.
Step 10: Top with Cherry Sauce
Slice generous wedges and drizzle them with the chilled cherry sauce. Each bite is a heavenly combination of chocolaty creaminess and bright, juicy fruitiness that will keep everyone coming back for more.
How to Serve Chocolate Cherry No-Bake Cheesecake Recipe
Garnishes
Your cheesecake deserves a touch of flair. Fresh cherries, a sprinkle of chocolate shavings, or even a dollop of whipped cream can add beautiful texture and visual appeal, while complementing the flavors already at play.
Side Dishes
This cheesecake stands wonderfully on its own, but pairing it with a scoop of vanilla bean ice cream or a delicate cup of espresso can elevate the experience, highlighting the creamy richness and the cherry’s tang.
Creative Ways to Present
Think beyond the traditional slice! Try serving individual portions in clear glasses with layered cherry sauce, or create elegant mini cheesecakes using small molds. Presentation is all about making the dessert feel special—and this recipe is as versatile as it is delicious.
Make Ahead and Storage
Storing Leftovers
Leftover cheesecake keeps beautifully in the fridge, tightly covered with plastic wrap or stored in an airtight container for up to 4 days. This allows the flavors to deepen even more, so don’t shy away from making it ahead!
Freezing
If you want to keep your cheesecake longer, freezing is a great option. Wrap it carefully with multiple layers of plastic wrap and aluminum foil. It can stay frozen for up to 2 months—just thaw in the fridge overnight before serving.
Reheating
This cheesecake is best enjoyed chilled, so reheating isn’t recommended. Simply serve it cold from the fridge or fully thawed from the freezer. The cream cheese filling holds its silky texture best when cool.
FAQs
Can I use fresh cherries instead of frozen?
Absolutely! Fresh cherries offer a vibrant natural sweetness, but frozen cherries work wonderfully too and make the recipe easier year-round without sacrificing flavor.
What if I don’t have a springform pan?
You can use a regular cake pan lined with parchment paper or even removable silicone pans, but just be extra gentle when removing the crust and cheesecake since springform pans make it much easier.
Can this cheesecake be made dairy-free?
With some ingredient swaps like dairy-free cream cheese, coconut cream instead of heavy cream, and dairy-free chocolate, this recipe can be adapted—but keep in mind the texture and taste may change slightly.
Is it possible to make the crust gluten-free?
Yes! Just replace the Oreos with a gluten-free chocolate cookie or cracker of your choice—you’ll still get that delicious, crunchy base that pairs beautifully with the filling.
How long does the cheesecake take to set?
The cheesecake needs at least 4 hours in the fridge to fully set, though overnight chilling will give the best results for clean slicing and perfect texture.
Final Thoughts
There’s something so satisfying about whipping up this Chocolate Cherry No-Bake Cheesecake Recipe—it’s indulgent yet easy, impressive yet approachable. Whether you’re aiming to wow guests or just treat yourself, this cheesecake promises a luscious, chocolatey slice of joy topped with vibrant cherry goodness. Go ahead, give it a try and create a new favorite dessert that’s sure to become a staple in your recipe collection.
Print
Chocolate Cherry No-Bake Cheesecake Recipe
- Prep Time: 30 minutes
- Cook Time: 15 minutes
- Total Time: 4 hours 45 minutes
- Yield: 8 servings
- Category: Dessert
- Method: No-Cook
- Cuisine: American
- Diet: Vegetarian
Description
This decadent Chocolate Cherry No-Bake Cheesecake is a luscious dessert that combines a rich chocolate cookie crust with a smooth cocoa and dark chocolate cream cheese filling, topped with a sweet and tangy cherry sauce. Perfectly set without any baking, it’s an impressive yet easy-to-make dessert that delights chocolate and fruit lovers alike.
Ingredients
Crust
- 16 Oreos or chocolate sandwich cookies (filling removed)
- 1/4 teaspoon salt
- 1/4 cup melted butter
Filling
- 1 1/2 cups heavy whipping cream
- 1 envelope unflavored gelatin
- 8 oz cream cheese, softened
- 1/2 cup powdered sugar
- 1/4 cup Dutch-processed cocoa powder
- 4 oz dark chocolate, melted
- 1 teaspoon vanilla extract
Cherry Sauce
- 2 cups pitted cherries (fresh or frozen)
- 1/4 cup sugar
- 1 tablespoon cornstarch
- 1 tablespoon lemon juice
Instructions
- Crush the Cookies: In a food processor, crush 16 Oreo cookies into fine crumbs. Mix these crumbs with 1/4 teaspoon salt and 1/4 cup melted butter until the mixture is well combined and crumbly.
- Form the Crust: Press the cookie crumb mixture evenly into the bottom of a springform pan to form a solid crust. Set the pan aside while preparing the filling.
- Dissolve the Gelatin: Combine 1/2 cup of the heavy whipping cream with one envelope of unflavored gelatin in a microwave-safe bowl. Let the gelatin sit for 5 minutes to bloom, then microwave for 1 minute, stirring halfway through. Allow the mixture to cool.
- Make the Filling: In a large bowl, beat 8 oz softened cream cheese, 1/2 cup powdered sugar, 1/4 cup Dutch-processed cocoa powder, and 4 oz melted dark chocolate until smooth. Gradually add the remaining 1 cup of whipping cream and 1 teaspoon vanilla extract, mixing until fully combined and creamy.
- Add Gelatin: Slowly incorporate the cooled gelatin mixture into the cream cheese filling, stirring well to ensure even distribution.
- Assemble: Pour the cheesecake filling over the prepared cookie crust in the springform pan. Smooth the top with a spatula. Refrigerate for at least 4 hours or until fully set and firm.
- Cook the Sauce: In a medium saucepan, combine 2 cups pitted cherries, 1/4 cup sugar, 1 tablespoon cornstarch, and 1 tablespoon lemon juice. Cook over medium heat, stirring occasionally, until the mixture boils and thickens into a glossy sauce.
- Cool: Remove the cherry sauce from heat and let it cool to room temperature. Then refrigerate until chilled.
- Remove from Pan: After the cheesecake is fully set, carefully remove it from the springform pan and place it on a serving plate.
- Top with Cherry Sauce: Serve slices of the no-bake chocolate cheesecake topped generously with chilled cherry sauce for a perfect balance of rich chocolate and fresh fruit flavors.
Notes
- Ensure the cream cheese is softened to room temperature for a smooth filling.
- The crust can be prepared in advance and refrigerated until filling is ready.
- Gelatin must be fully dissolved and cooled to avoid lumps in the filling.
- Fresh or frozen cherries can be used for the sauce; if frozen, thaw before cooking.
- Chilling the cheesecake for longer than 4 hours will improve firmness and flavor meld.
- For a dairy-free version, substitute cream cheese and heavy cream with suitable plant-based alternatives and a vegan gelatin substitute.


