
“`html
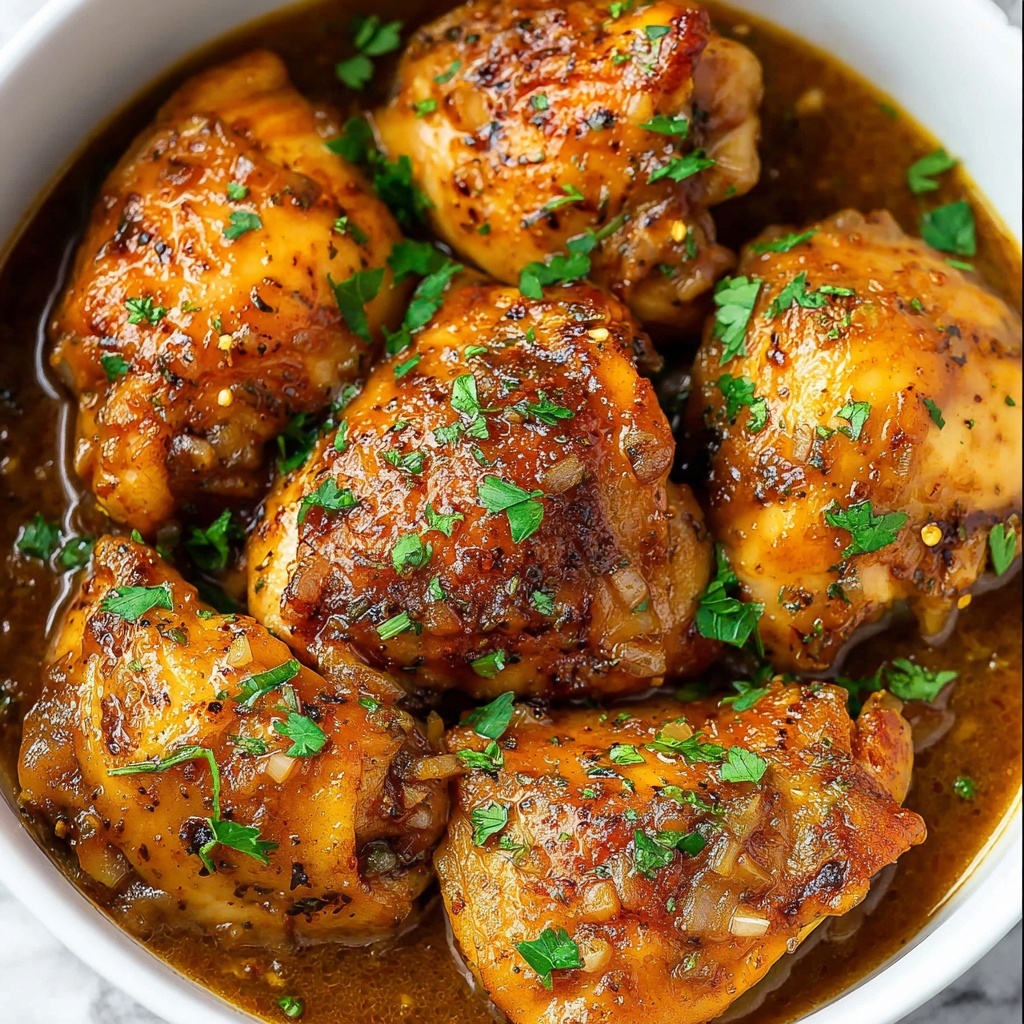
If you’re looking for a guaranteed crowd-pleaser that bursts with zesty brightness and rich buttery goodness, then the Instant Pot Lemon Butter Chicken Thighs Recipe is your new best friend. This dish delivers tender, juicy chicken thighs soaked in a tangy lemon butter sauce that feels like a warm hug on a plate. What makes it extra special is how quickly the Instant Pot blends all those vibrant flavors, making weeknight dinners feel gourmet without all the fuss. Once you try this recipe, you’ll want to make it again and again!

Ingredients You’ll Need
Every ingredient in this Instant Pot Lemon Butter Chicken Thighs Recipe plays a crucial role in achieving that perfect harmony of flavor and texture. These simple pantry staples come together to create a dish that’s succulent, aromatic, and absolutely irresistible.
- 6 bone-in, skin-on chicken thighs: The skin crisps beautifully while the bone keeps the meat juicy and flavorful.
- 4 cloves garlic, minced: Adds a rich, savory depth that complements the lemon perfectly.
- ½ teaspoon paprika: Brings a mild smoky note and lovely color to the chicken.
- ½ teaspoon chili flakes: Adds a subtle kick that wakes up your taste buds without overpowering.
- ½ teaspoon garlic powder: Enhances garlic flavor, layering the seasoning for complexity.
- ¼ teaspoon salt: Essential for bringing out all the flavors in the dish.
- 2 tablespoons olive oil: Perfect for browning the chicken and creating a flavorful base.
- 5 tablespoons butter: The star of the sauce, giving it that luscious, velvety texture.
- ½ cup chopped onion: Adds sweetness and depth when sautéed until soft and fragrant.
- 3 tablespoons freshly squeezed lemon juice: For bright acidity and that signature lemon punch.
- 1 tablespoon Italian seasoning: A blend of herbs that rounds out the dish with earthy and floral notes.
- 1 tablespoon lemon zest: Intensifies the lemon flavor with its aromatic oils.
- ⅓ cup low-sodium chicken broth: Keeps the sauce moist and adds savory undertones.
- 1 tablespoon cornstarch: Used to thicken the sauce to the perfect consistency.
- 1 tablespoon water: Combined with cornstarch for a smooth slurry.
- Fresh chopped parsley and lemon slices, for garnish: Adds freshness and a beautiful final touch.
- Cooked rice or noodles and roasted vegetables (optional): Ideal for serving and soaking up the delicious sauce.
How to Make Instant Pot Lemon Butter Chicken Thighs Recipe
Step 1: Season the Chicken
Start by combining paprika, chili flakes, salt, and garlic powder in a small bowl. Rub this flavorful seasoning mix liberally all over the chicken thighs. Getting that coat evenly ensures every bite will be perfectly seasoned and a little hint of smokiness and spice will be infused into the meat.
Step 2: Brown the Chicken
Set your Instant Pot to “Sauté” mode and heat the olive oil until shimmering. Lay the chicken thighs skin-side down and cook until they develop a golden, crispy crust—this step locks in the juices and adds incredible texture. Flip and brown the other side, then remove the thighs and set them aside temporarily.
Step 3: Sauté and Deglaze
Add the butter, chopped onion, and minced garlic to the pot. Sauté everything together until the onions turn soft and translucent and the garlic releases its irresistible aroma. Pour in the freshly squeezed lemon juice and use a wooden spoon to scrape up all the browned bits clinging to the bottom of the pot—this is where the magic happens! Stir in the Italian seasoning, lemon zest, and chicken broth to create an aromatic, flavorful base for your sauce.
Step 4: Pressure Cook
Return the browned chicken thighs to the pot, nestling them right into the sauce. Lock the lid in place, make sure the valve is set to “Sealing,” and cook on high pressure for 7 minutes. Once the cooking time is up, let the Instant Pot naturally release pressure for 5 minutes before manually releasing any leftover pressure. This careful timing ensures the chicken is tender yet still perfectly juicy.
Step 5: Thicken the Sauce
Carefully remove the chicken and set it aside to keep warm. In a small bowl, whisk together the cornstarch and water to make a slurry. Pour this mixture into the pot and switch back to “Sauté” mode. Whisk continuously until the sauce thickens to a luscious, velvety consistency that will cling beautifully to the chicken.
Step 6: Serve
Return the chicken thighs to the pot, tossing them gently in the thickened lemon butter sauce. Garnish generously with fresh chopped parsley and elegant lemon slices. Serve hot, alongside your favorite cooked rice or noodles and some roasted vegetables to complete the meal and soak up every last drop of that glorious sauce.
How to Serve Instant Pot Lemon Butter Chicken Thighs Recipe
Garnishes
A sprinkle of fresh chopped parsley adds a pop of green color along with a gentle herbaceous note, while bright lemon slices make the presentation pop visually and invite that zesty aroma to your senses before the first bite. Don’t skip the garnishes—they elevate the dish and bring freshness to every forkful.
Side Dishes
This Instant Pot Lemon Butter Chicken Thighs Recipe pairs beautifully with fluffy white rice, buttery mashed potatoes, or tender noodles, all of which soak up the rich sauce perfectly. Roasted or steamed vegetables like asparagus, green beans, or broccoli add a crisp texture contrast and vibrant color to the plate. These sides keep the meal balanced and satisfying.
Creative Ways to Present
For a fun twist, serve the chicken over a bed of creamy polenta instead of traditional sides, or pile it high on crusty garlic bread to make it a playful sauce dunking feast. You can also try plating individual portions with a drizzle of the sauce zigzagged artistically across the plate and a sprinkle of lemon zest on top—it looks restaurant-worthy and tastes amazing.
Make Ahead and Storage
Storing Leftovers
Leftover chicken and sauce can be stored in an airtight container in the refrigerator for up to 3 days. The flavors tend to deepen as they sit, making your lunch or dinner the next day even more delicious. Just be sure to cool it down before refrigerating to keep the texture perfect.
Freezing
If you want to keep this Instant Pot Lemon Butter Chicken Thighs Recipe on hand for longer, it freezes beautifully. Store the chicken and sauce together in a freezer-safe container or bag for up to 3 months. Thaw overnight in the fridge before reheating for a quick, stress-free meal anytime.
Reheating
The best way to reheat leftover chicken is gently on the stovetop over low heat, stirring occasionally to keep the butter sauce from separating. Alternatively, microwave on medium power in short bursts, stirring in between until warmed through. Adding a splash of chicken broth or water can help loosen the sauce back to silky perfection.
FAQs
Can I use boneless chicken thighs instead?
Absolutely! Boneless chicken thighs work well in this recipe, and they cook slightly faster, so reduce pressure cooking time to about 5 minutes to keep them tender and juicy.
Is the chili flakes amount adjustable?
Yes! If you prefer your dish milder, simply reduce or omit the chili flakes. Conversely, add a pinch more if you like a bit more heat to complement the lemon and butter flavors.
Can I use lemon juice from a bottle?
Fresh lemon juice is highly recommended for the brightest, freshest flavor, but if bottled lemon juice is what you have on hand, it will still yield a tasty result—just make sure to choose a high-quality, 100% lemon juice for best taste.
Do I need to brown the chicken first?
Browning the chicken adds amazing color and flavor, so while you could skip this step, it’s worth the few extra minutes for that extra depth and crispy skin.
Can this recipe be doubled?
Yes! You can easily double the ingredients to serve a bigger crowd, just be sure not to overfill your Instant Pot. Cook in batches if needed to keep everything cooking evenly and safely.
Final Thoughts
This Instant Pot Lemon Butter Chicken Thighs Recipe is truly a gem—so simple to make yet packed with bright, buttery, and comforting flavors that everyone will love. Whether you’re cooking for family, impressing friends, or treating yourself to a delicious meal, this recipe delivers every time. Give it a try soon; it might just become your new go-to chicken dinner!
“`
Print
Instant Pot Lemon Butter Chicken Thighs Recipe
- Prep Time: 15 minutes
- Cook Time: 32 minutes
- Total Time: 47 minutes
- Yield: 6 servings
- Category: Main Course
- Method: Instant Pot
- Cuisine: American
- Diet: Low Salt
Description
This Instant Pot Lemon Butter Chicken Thighs recipe delivers tender, juicy chicken infused with bright lemon flavor and a rich buttery sauce. Perfectly seasoned and cooked under pressure for optimal tenderness, these chicken thighs are browned first for added depth, then pressure cooked with garlic, lemon, and Italian seasoning. Finished with a luscious thickened sauce and garnished with parsley and lemon slices, this dish pairs wonderfully with rice, noodles, or roasted vegetables for a complete, satisfying meal in under an hour.
Ingredients
Chicken
- 6 bone-in, skin-on chicken thighs
Seasoning
- 4 cloves garlic, minced
- ½ teaspoon paprika
- ½ teaspoon chili flakes
- ½ teaspoon garlic powder
- ¼ teaspoon salt
Cooking Ingredients
- 2 tablespoons olive oil
- 5 tablespoons butter
- ½ cup chopped onion
- 3 tablespoons freshly squeezed lemon juice
- 1 tablespoon Italian seasoning
- 1 tablespoon lemon zest
- ⅓ cup low-sodium chicken broth
- 1 tablespoon cornstarch
- 1 tablespoon water
Garnish and Serving
- Fresh chopped parsley
- Lemon slices
- Cooked rice or noodles and roasted vegetables (optional)
Instructions
- Season Chicken: Combine paprika, chili flakes, salt, and garlic powder in a small bowl. Rub this seasoning mixture evenly onto the chicken thighs to ensure every piece is flavorful.
- Brown Chicken: Set your Instant Pot to ‘Sauté’ mode and heat olive oil. Add the seasoned chicken thighs and cook until golden brown on both sides, about 3-4 minutes per side. Remove the chicken and set it aside.
- Sauté and Deglaze: Add butter, chopped onion, and minced garlic to the pot. Sauté until the onions are soft and the mixture is fragrant, approximately 2-3 minutes. Pour in the lemon juice and scrape the bottom of the pot to deglaze, lifting all the browned bits. Stir in Italian seasoning, lemon zest, and chicken broth to combine the flavors.
- Pressure Cook: Return the browned chicken thighs to the Instant Pot. Secure the lid and set the valve to ‘Sealing.’ Cook on high pressure for 7 minutes. After cooking, allow a natural pressure release for 5 minutes before manually releasing any remaining pressure.
- Thicken Sauce: Remove the chicken thighs and set them aside to keep warm. In a small bowl, whisk together cornstarch and water to create a slurry. Turn the Instant Pot back to ‘Sauté’ mode, add the slurry, and whisk continuously until the sauce thickens, about 2-3 minutes.
- Serve: Return the chicken to the pot and coat with the thickened sauce. Garnish with freshly chopped parsley and lemon slices. Serve alongside cooked rice or noodles and roasted vegetables if desired for a complete meal.
Notes
- For extra crisp skin, you may broil the chicken thighs in the oven for a few minutes before serving.
- If you prefer a spicier dish, add more chili flakes to the seasoning mix.
- You can substitute chicken broth with vegetable broth for a slightly different flavor profile.
- Ensure to scrape the bottom of the pot well when deglazing to avoid the burn warning on the Instant Pot.
- Leftovers can be stored in an airtight container in the refrigerator for up to 3 days.


