
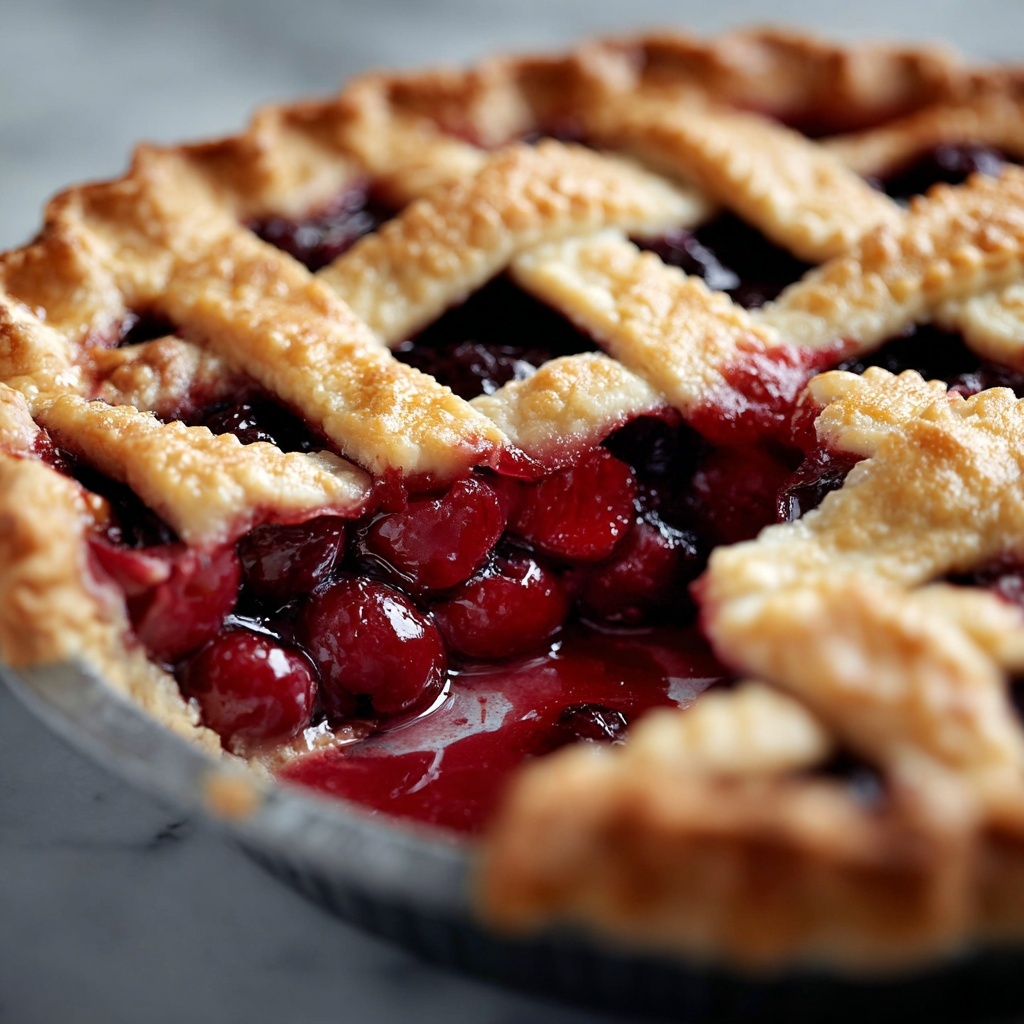
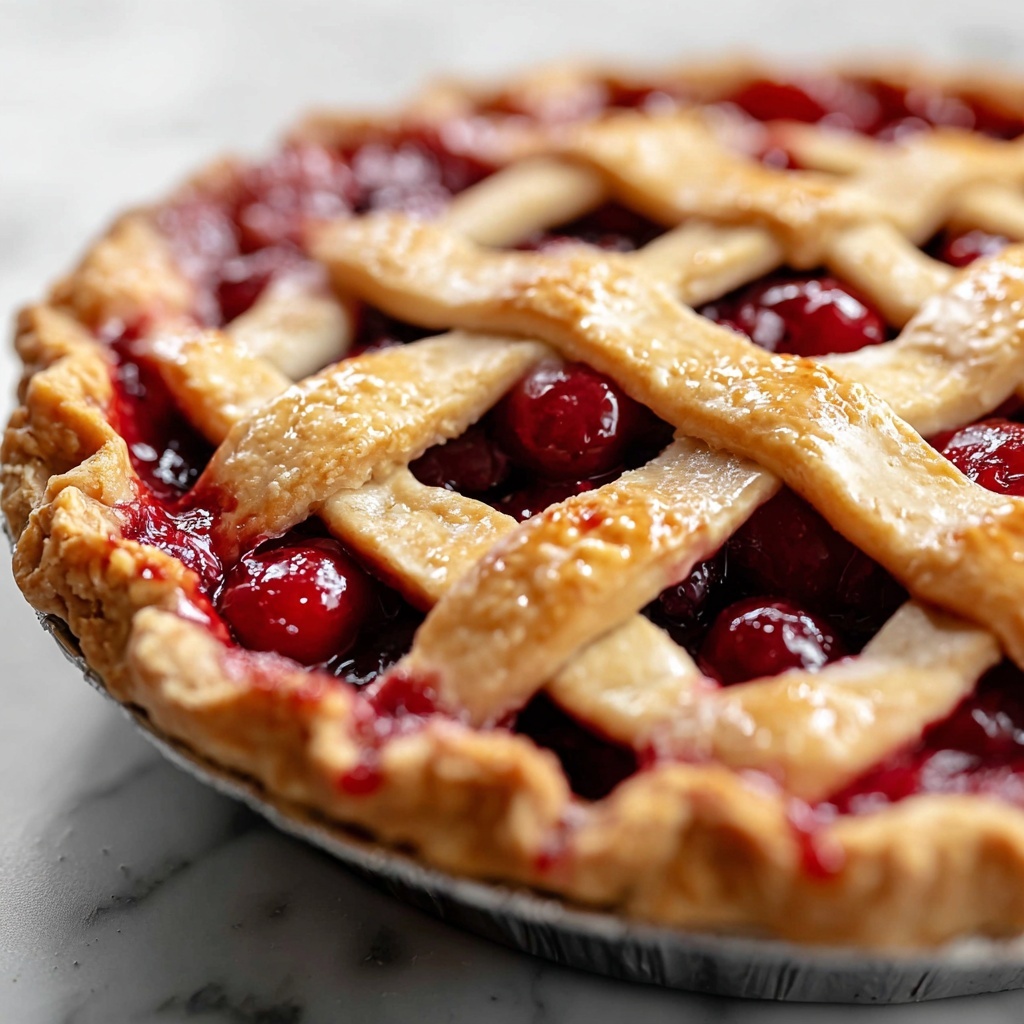
If you’re craving a dessert that perfectly captures the sweet-tart magic of summer, this Homemade Cherry Pie Recipe will quickly become your go-to. Bursting with fresh cherries and wrapped in a flaky, buttery crust, it delivers that classic nostalgic feeling with every bite. With just a handful of simple ingredients and straightforward steps, you can create a pie that looks stunning and tastes incredible, whether it’s for a cozy family dinner or a special celebration. Let me walk you through how to make this irresistible homemade cherry pie that’s sure to impress everyone at your table.
Ingredients You’ll Need
Great food always starts with great ingredients, and this pie is no exception. Each item plays a vital role in building the flavor, texture, and beautiful color of the final dish. Fresh cherries bring vibrant brightness, sugar balances the tartness, and the crust provides that buttery, flaky foundation every pie needs.
- 4 cups fresh cherries, pitted: Fresh is best here to ensure juicy, flavorful filling.
- 1 cup sugar: Sweetens the cherries and helps create a luscious syrup.
- 1 pie crust (store-bought or homemade): Choose a buttery crust for the perfect flaky texture.
- 2 tablespoons cornstarch: Thickens the cherry juices so your pie isn’t runny.
- 1 tablespoon lemon juice: Lifts the flavors and enhances the natural cherry tartness.
- 1 teaspoon vanilla extract: Adds warmth and depth to the filling.
How to Make Homemade Cherry Pie Recipe
Step 1: Prepare the Cherry Filling
Start by washing and meticulously pitting your fresh cherries; this takes a bit of time but is so worth it for fresh flavor and perfect texture. Combine the cherries in a bowl with sugar, cornstarch, lemon juice, and vanilla extract. Letting the mixture sit for a few minutes helps the sugar draw out the juices, blending flavors beautifully.
Step 2: Assemble the Pie Crust Base
On a floured surface, roll out half of your pie dough carefully so it’s even and not stretched — this prevents shrinking during baking. Gently place it in your pie dish, pressing it into the edges but keeping it loose enough to avoid tension. A well-placed crust makes for a tender, flaky bottom to hold your filling.
Step 3: Fill and Cover the Pie
Pour the luscious cherry filling evenly over the dough, taking care not to overfill and cause spills. Roll out the remaining dough for the top layer. Whether you cut slits to let steam escape or create a beautiful lattice pattern, this step adds charm and lets your pie bake evenly with that golden crust finish.
Step 4: Bake to Perfection
Pop your pie into a preheated 425°F (220°C) oven and bake it for 45 to 50 minutes. You’ll know it’s ready when the crust is gloriously golden brown and cherry juices are bubbling through. This signals the perfect balance where the crust is crunchy but tender, and the filling is thick and luscious.
Step 5: Cool and Serve
Patience is a virtue, especially with cherry pie. Let your pie cool for at least an hour so the filling can set nicely and slice cleanly. Serve warm, and consider pairing it with whipped cream or a scoop of vanilla ice cream for an irresistible treat.
How to Serve Homemade Cherry Pie Recipe
Garnishes
Simple garnishes can elevate your homemade cherry pie stunningly. A dollop of freshly whipped cream adds lightness, while a sprinkle of powdered sugar dusted over the crust offers a delicate sweetness and pretty presentation. For a gourmet touch, a few toasted almond flakes provide an engaging crunch.
Side Dishes
This pie shines as a standalone dessert but also pairs beautifully with certain side dishes. A cup of strong coffee or a refreshing iced tea complements the sweetness perfectly. If serving at brunch or a festive meal, alongside creamy vanilla custard or a scoop of ice cream transforms it into a luxurious finale.
Creative Ways to Present
Don’t be afraid to get creative when serving the Homemade Cherry Pie Recipe. Try slicing the pie into smaller, individual portions and serve them in mini dessert plates with lightly drizzled chocolate or caramel sauce. For special occasions, top each slice with a fresh cherry and mint leaf for a pop of color and extra charm.
Make Ahead and Storage
Storing Leftovers
Leftover cherry pie can be stored in the refrigerator, tightly covered with plastic wrap or foil to keep it fresh and prevent the crust from drying out. It will stay delicious for up to 3 days, making it perfect for enjoying again without sacrificing quality.
Freezing
If you want to enjoy your pie later, freezing is a fantastic option. Wrap the whole pie or individual slices well with plastic wrap and then aluminum foil before popping it into the freezer. The Homemade Cherry Pie Recipe keeps well frozen for up to 2 months without losing its wonderful flavor or texture.
Reheating
To warm up refrigerated or frozen pie slices, place them on a baking sheet and heat in a 350°F (175°C) oven for about 15 minutes or until warmed through. This helps revive the flaky crust and enhances the aroma of the cherry filling. Avoid microwave reheating if you want to keep the crust crisp.
FAQs
Can I use frozen cherries instead of fresh for this pie?
Absolutely! Frozen cherries work well, especially out of season. Just be sure to thaw and drain excess liquid before mixing with the other ingredients to avoid a soggy pie.
Is it necessary to use cornstarch in the filling?
Cornstarch acts as a thickener, giving the filling that perfect, sliceable consistency. Without it, the filling might be too runny, so I highly recommend including it for best results.
Can I make the pie crust from scratch?
Yes! Homemade pie crust adds an extra layer of flavor and texture. If you have time and enjoy baking, making your own crust can elevate the Homemade Cherry Pie Recipe even more.
What’s the best way to prevent the crust from burning during baking?
Sometimes the edges brown faster, so shielding them with foil or a pie crust shield partway through baking can keep the crust golden without burning.
How long should I cool the pie before cutting?
Cooling for at least one hour helps the filling set properly. Cutting too soon can cause the juices to run, so patience will reward you with clean, beautiful slices.
Final Thoughts
Making this Homemade Cherry Pie Recipe is such a rewarding experience—it’s like bottling up a little bit of sunshine and sharing it with loved ones. With fresh ingredients and simple steps, you can create a pie that’s both comforting and elegant. I can’t wait for you to try it and enjoy every sweet, tart bite as much as I do!
Print
Homemade Cherry Pie Recipe
- Prep Time: 20 minutes
- Cook Time: 50 minutes
- Total Time: 1 hour 10 minutes
- Yield: 8 servings
- Category: Dessert
- Method: Baking
- Cuisine: American
- Diet: Vegetarian
Description
This homemade cherry pie features a luscious filling made from fresh cherries combined with sugar, cornstarch, lemon juice, and vanilla extract, all encased in a flaky pie crust. Perfectly baked until golden and bubbling, this classic dessert is delicious served warm with a dollop of whipped cream or a scoop of ice cream.
Ingredients
Cherry Filling
- 4 cups fresh cherries, pitted
- 1 cup sugar
- 2 tablespoons cornstarch
- 1 tablespoon lemon juice
- 1 teaspoon vanilla extract
Pie Crust
- 1 pie crust (store-bought or homemade)
Instructions
- Prepare Cherries: Wash and pit the fresh cherries thoroughly to remove any stems and seeds.
- Mix Filling: In a mixing bowl, combine the pitted cherries with sugar, cornstarch, lemon juice, and vanilla extract. Stir well and let the mixture sit to meld the flavors.
- Prepare Bottom Crust: On a floured surface, roll out half of the pie dough. Carefully transfer it into your pie dish, ensuring you do not stretch the dough to avoid shrinking during baking.
- Add Filling: Pour the cherry filling evenly over the bottom crust in the pie dish.
- Prepare Top Crust: Roll out the remaining dough into a circle. Cut slits for steam to escape or create a decorative lattice design, then place it over the cherry filling. Seal and crimp the edges to enclose the pie.
- Bake: Preheat your oven to 425°F (220°C). Bake the pie for 45-50 minutes or until the crust is golden brown and the filling is bubbly.
- Cool and Serve: Let the pie cool for at least one hour before slicing. Serve warm with whipped cream or vanilla ice cream for an extra indulgent treat.
Notes
- Using fresh cherries enhances flavor, but frozen cherries can be used if fresh are unavailable; be sure to thaw and drain excess liquid.
- Chilling the pie crust before rolling can help prevent shrinkage.
- Cover the pie edges with foil halfway through baking if the crust browns too quickly.
- Allowing the pie to cool fully helps the filling set and makes slicing easier.


