“`html
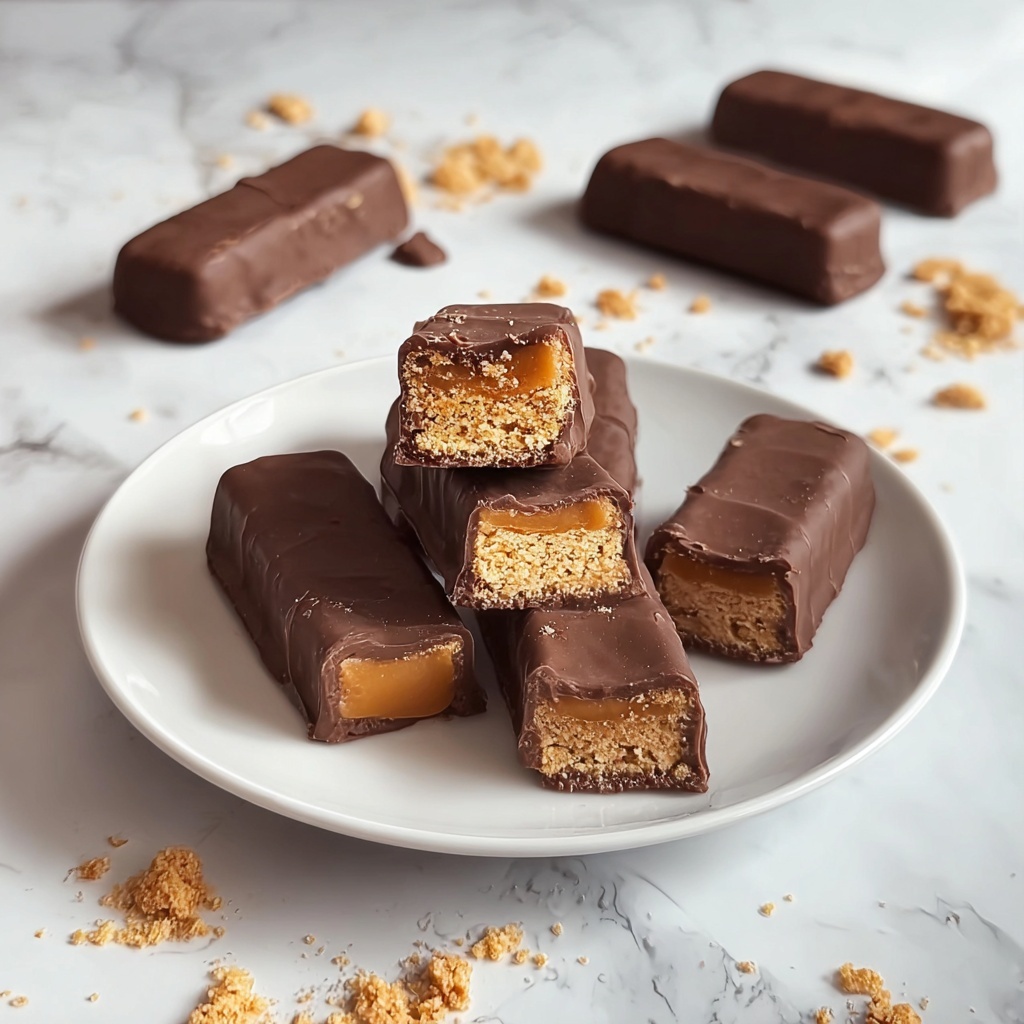
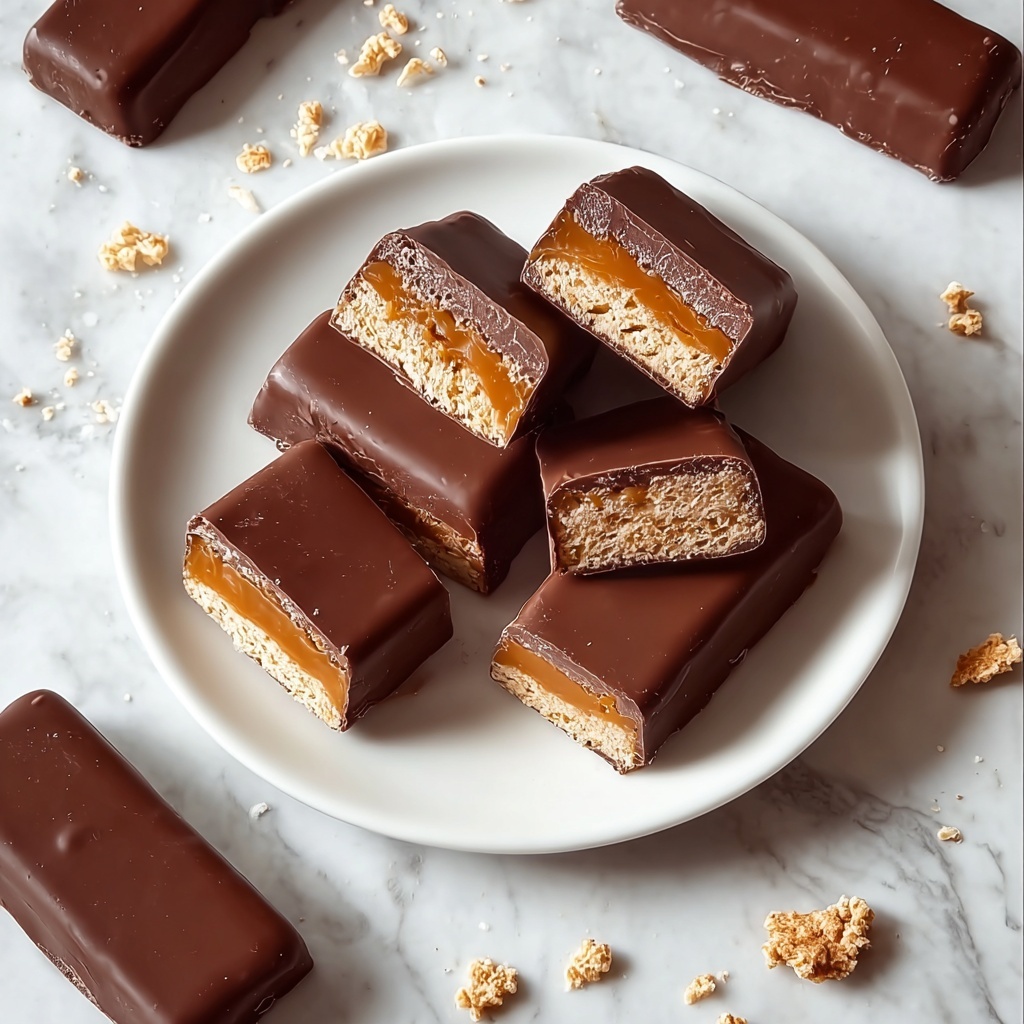
If you’re craving something sweet but want to keep it wholesome, these Healthy Twix Bars: Guilt-Free Indulgence Recipe are just the ticket. Imagine that perfect balance of a crisp, buttery base, a luscious peanut butter caramel layer, and a rich chocolate topping—only made with nourishing ingredients you can feel great about. They’re wonderfully satisfying, surprisingly simple to whip up, and perfect for those moments when you want a treat but not the guilt. Trust me, once you try this recipe, these bars will quickly become your favorite go-to snack or dessert.

Ingredients You’ll Need
Each ingredient in this recipe plays an important role, working together to create a delightful harmony of flavors and textures. From the nutty almond flour to the silky peanut butter and glossy chocolate finish, these components are both straightforward and essential.
- 2 cups Almond Flour: Provides a tender, slightly nutty shortbread base; try oat flour for a softer texture.
- 1/2 cup Butter (or Coconut Oil): Adds richness and helps bind the crust perfectly; plant-based butter works nicely for dairy-free versions.
- 1/4 cup Maple Syrup: Naturally sweetens with a subtle depth of flavor, honey is a lovely floral alternative.
- 1 teaspoon Vanilla Extract: Enhances every layer with aromatic warmth; almond extract makes an exciting twist.
- 1/4 teaspoon Salt: Balances sweetness and intensifies flavor; sea salt is a superb substitute.
- 1 cup Creamy Peanut Butter: Creates that irresistible caramel-style filling; almond or sunflower butter are perfect for nut-free diets.
- 1 cup Chocolate Chips: Melts into a decadent topping; dark chocolate chunks elevate richness beautifully.
- 2 tablespoons Coconut Oil: Helps melt and smooth the chocolate layer; vegetable oil can be swapped in if needed.
How to Make Healthy Twix Bars: Guilt-Free Indulgence Recipe
Step 1: Prepare the Shortbread Base
Start by preheating your oven to 350°F (175°C) and lining an 8×8 inch baking pan with parchment paper to ensure easy removal later. In a mixing bowl, combine the almond flour, melted butter (or coconut oil), maple syrup, vanilla extract, and salt until you get a crumbly but pressable dough. Press it evenly into your pan and bake for about 10-12 minutes until it turns a lovely golden brown. This base serves as the crispy foundation for everything that follows and gets you one step closer to that perfectly balanced bite.
Step 2: Create the Peanut Butter Filling
While the crust cools, mix together the creamy peanut butter, an extra splash of maple syrup, vanilla extract, and a small handful of almond flour in a separate bowl. This mixture is your sweet, nutty caramel layer that mimics the classic Twix caramel but without any refined sugars. Once smooth, spread this filling lovingly over the cooled shortbread layer, smoothing it out to the edges for each bar to have that delightful gooey center. Pop the pan into the freezer for at least an hour to let this layer set perfectly.
Step 3: Coat with Chocolate
Now the moment of pure indulgence: melt your chocolate chips with the coconut oil in a double boiler or microwave, stirring frequently until glossy and silky. Carefully remove the pan from the freezer and either pour the melted chocolate over the entire surface or dip freshly cut bars to coat them individually, letting excess chocolate drip off. A sprinkle of sea salt over the top before the chocolate sets adds a gourmet touch by enhancing all those beautiful flavors. Return the bars to the freezer for about 10 minutes so the chocolate hardens into that perfect snap we all love.
How to Serve Healthy Twix Bars: Guilt-Free Indulgence Recipe
Garnishes
For an extra flair when serving these bars, consider a light dusting of crushed nuts such as toasted pecans or walnuts to add crunch and visual appeal. A tiny pinch of flaky sea salt on top of the chocolate elevates the flavor, making each bite a wonderful contrast between sweet and salty. You might also drizzle a thin line of melted peanut butter or dark chocolate across the bars to highlight their layers beautifully.
Side Dishes
These bars stand powerfully on their own but pair wonderfully with a scoop of vanilla Greek yogurt or a dollop of coconut whipped cream to add a creamy counterpoint to their crisp and chocolaty texture. Fresh fruit, like raspberries or sliced bananas, complements the nutty sweetness and adds invigorating brightness to each bite. A warm cup of herbal tea or rich coffee is an ideal companion to balance the indulgence.
Creative Ways to Present
Transform your presentation by cutting the bars into smaller bite-sized squares for a party platter or stacking them on a beautiful serving dish with edible flowers for a visually stunning treat. Wrapping individual bars in parchment tied with twine makes a charming homemade gift or lunchbox surprise. For an interactive twist, serve melted chocolate and nut toppings alongside so guests can customize their own bars fresh from the freezer.
Make Ahead and Storage
Storing Leftovers
Keep your Healthy Twix Bars in an airtight container in the refrigerator to maintain their texture and freshness. Stored this way, they stay deliciously firm and can last up to a week, making them a perfect ready-to-go snack or dessert whenever the craving strikes.
Freezing
If you want to prepare ahead or keep these divine bars longer, wrap individual pieces tightly in plastic wrap and place them in a freezer-safe container or bag. Frozen, they hold their best quality for up to 3 months. When you’re ready to enjoy, simply thaw at room temperature briefly or eat them straight from the freezer for an especially refreshing treat.
Reheating
For a soft and gooey experience, let the bars sit out for about 10-15 minutes before eating. Avoid microwaving as it can melt the chocolate unevenly and alter the bar’s structure. Instead, a gentle room temperature thaw preserves their delightful layers and texture perfectly.
FAQs
Can I use a different nut butter in the Healthy Twix Bars: Guilt-Free Indulgence Recipe?
Absolutely! Almond butter or sunflower seed butter work beautifully if you’re avoiding peanuts. Just choose a creamy variety to keep that smooth caramel-like filling.
Is it possible to make these bars vegan?
Yes, simply swap the butter for coconut oil or a plant-based butter and use a dairy-free chocolate chip option. Maple syrup is already plant-based, so this recipe adapts easily.
How do I ensure the chocolate coating hardens properly?
Make sure to melt the chocolate slowly and smoothly with coconut oil, and chill the bars in the freezer after coating them. This helps the chocolate set with a nice firmness and snap.
Can I replace almond flour with another flour?
Oat flour is a great substitute that gives a slightly different texture. Just keep in mind the flavors and moisture content may vary slightly, but it still yields delicious bars.
How long does it take to make the Healthy Twix Bars: Guilt-Free Indulgence Recipe?
Active preparation takes around 20-30 minutes, plus baking and freezing time, making the total about 1 hour and 45 minutes. The waiting time is worth the final indulgent reward!
Final Thoughts
These Healthy Twix Bars: Guilt-Free Indulgence Recipe prove that you don’t have to sacrifice flavor for wellness. Every bite offers a perfect harmony of crunchy, creamy, and chocolatey that satisfies your sweet tooth and your health goals alike. Give this recipe a try—you’ll be amazed at how easy and rewarding making your own wholesome treats can be. Once you discover these bars, they’ll quickly become a beloved staple in your recipe collection, ready to brighten your day anytime.
“`
Print
Healthy Twix Bars: Guilt-Free Indulgence Recipe
- Prep Time: 20 minutes
- Cook Time: 12 minutes
- Total Time: 1 hour 45 minutes
- Yield: 16 servings
- Category: Dessert
- Method: Baking
- Cuisine: American
- Diet: Vegetarian
Description
Enjoy these Healthy Twix Bars, a guilt-free indulgence combining a buttery almond flour shortbread, creamy peanut butter caramel filling, and a rich chocolate coating. Perfectly balanced to satisfy your sweet tooth with wholesome ingredients and easy to make at home.
Ingredients
Shortbread Base
- 2 cups Almond Flour (Substitute with oat flour for a different texture)
- 1/2 cup Butter or Coconut Oil (Use plant-based butter for a dairy-free option)
- 1/4 cup Maple Syrup (Can be replaced with honey for a floral flavor)
- 1 teaspoon Vanilla Extract (Use almond extract for a unique twist)
- 1/4 teaspoon Salt (Sea salt can be a great substitute)
Peanut Butter Filling
- 1 cup Creamy Peanut Butter (Nut-free options include almond or sunflower butter)
- 2 tablespoons Maple Syrup
- 1/2 teaspoon Vanilla Extract
- 1 tablespoon Almond Flour (to help smooth the filling)
Chocolate Coating
- 1 cup Chocolate Chips (Opt for dark chocolate chunks for richness)
- 2 tablespoons Coconut Oil (Substitute with vegetable oil if desired)
Instructions
- Preheat the Oven: Preheat your oven to 350°F (175°C) and line an 8×8 inch baking pan with parchment paper to ensure easy removal of the bars after baking.
- Prepare the Shortbread Base: In a mixing bowl, combine the almond flour, melted butter or coconut oil, maple syrup, vanilla extract, and salt. Stir until the mixture is well combined, then press it evenly into the prepared baking pan. Bake for 10-12 minutes or until the shortbread turns golden brown. Remove from oven and allow it to cool completely.
- Make the Peanut Butter Filling: In another bowl, mix creamy peanut butter, maple syrup, vanilla extract, and a bit of almond flour until smooth and spreadable. Spread this filling evenly over the cooled shortbread layer, smoothing the top with a spatula. Place the pan in the freezer for at least 1 hour to set the filling firmly.
- Prepare the Chocolate Coating: Melt the chocolate chips together with coconut oil in a microwave in short bursts or in a double boiler until smooth and glossy. Stir the mixture thoroughly to combine the coconut oil and chocolate fully.
- Coat the Bars with Chocolate: Remove the peanut butter layer from the freezer, cut into individual bars, then dip or coat each bar in the melted chocolate. Allow the excess chocolate to drip off before placing bars back on parchment paper.
- Final Set and Garnish: Once all bars are coated, drizzle any remaining melted chocolate over the bars for decoration and optionally sprinkle with a pinch of sea salt. Freeze the bars again for about 10 minutes to let the chocolate harden completely.
- Storage and Serving: Store the finished bars in an airtight container in the refrigerator for up to a week or serve immediately for a cool, refreshing treat.
Notes
- For a dairy-free version, substitute butter with coconut oil or plant-based butter.
- Use dark chocolate chips for a richer flavor and lower sugar content.
- You can substitute almond flour with oat flour for a different texture but expect a slightly softer shortbread.
- If you prefer a nut-free filling, swap peanut butter with sunflower or soy nut butter.
- These bars can be frozen for longer storage, just thaw in the fridge before eating.
- Adjust sweetness by varying maple syrup amounts to your taste.
